DIY Garland created from Paper Flowers
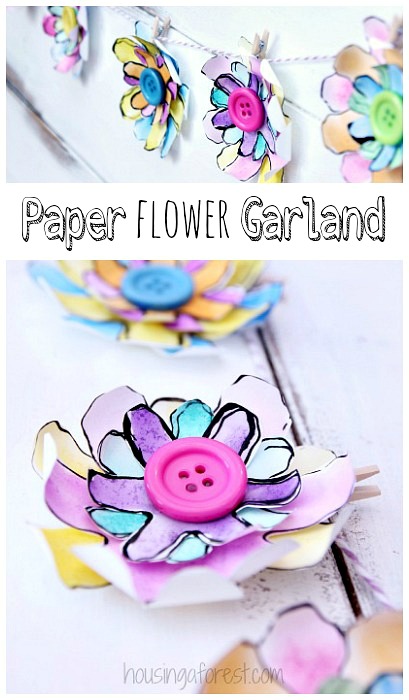
I love how flowers brighten a room. With spring just around the corner, It’s the perfect time to create a bright and colorful Paper Flower Garland with your kids! Let them paint their favorite color combination, and string them up were ever you need a little splash of color. Read on to find out how we created this simple DIY Garland.
I received free Creatify products from Horizon Group USA in exchange for my fair and honest review. All opinions expressed are 100% my own.
Shopping for craft supplies just got a whole lot easier. No need to make a special trip to the craft store. What? Creatify is releasing a fun line of craft supplies that can be found at Target stores starting in March 2015. They recently sent me a giant box packed full of crafty supplies to review and share with you. Love it! The first thing we noticed was all the creative names…Bling & Things, Glitz & Glam, Junk Drawer, All Tied Up…so fun!

Paper Flower Garland Supplies:
- Creatify Junk Drawer #2 ~ Colorful Buttons
- Creatify Bling & Things ~ Bakers Twine and Mini Clothes Pins
- Watercolor Paints
- Heavy Weight White Paper
- Black Tempera Paint
- 2 different sizes of Flower or Snowflake Cookie Cutters ~ we used Snowflakes
- Scissors
- Glue

Flower Petals:
Start by pouring a small amount of black paint onto a paint tray/paper plate. Next, encourage the kids dip their cookie cutter into the paint and stamp onto their paper. Easy Peasy! Continue stamping until their entire paper resembles a giant coloring book dotted with beautiful flower outlines. My favorite outlines are the ones where the cookie cutter “jumped” a little and there is a double impression…adds a little character. Set the paper aside to dry.
Now the kids can add a splash of color with watercolor paints. There is no right or wrong color combo…the more color the better! Once everything is dry, cut out each of the flowers. This is the perfect time to work on those scissor skills.

How to Assemble the Paper Flowers:
Now you have all the painting and cutting done, your ready to assemble the flowers. Each flower consists of 2 large petals, 2 small petals petals and a large brightly colored button.
- Layer and glue the 2 smaller petals together
- Layer and glue the 2 larger petals together.
- Layer and glue the smaller petal into the center of the larger petals.
- Finally, top everything off with a large colorful button from Creatify.
- Repeat until you have all the flowers you need for your garland.

How to make the DIY Garland:
Once all the flowers are all glued together, its time to assemble them into a fun garland. This is super easy with the bakers twine and mini clothes pins from Creatify. Simply cut a piece of twine the length you desire and secured it with a little tape. Then attached the flowers to the twine with a mini clothes pin. That’s it! What a simple and beautiful DIY garland.

Our simple Paper Flower Garland is so quick and easy to create. The kids especially loved stamping and painting the flowers! It would be a perfect addition to your spring or Easter mantel.
“Go ahead and give your little superheroes a mission. Creatify!”
Find more about Creatify on their Facebook page or follow along on their Instagram page.

Check out these creative ideas from Housing A Forest: