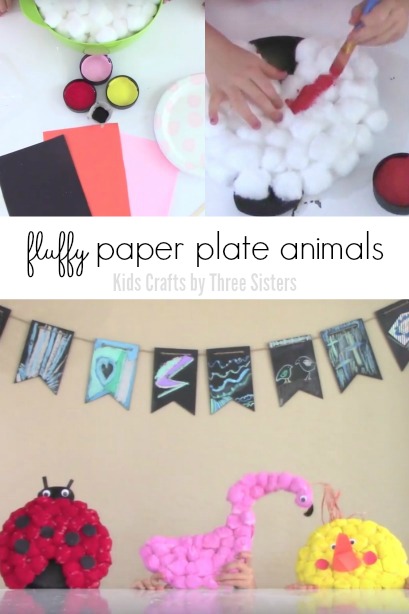
My kids love collecting interesting bugs, caterpillars and basically everything that wiggles.  They are always running in to the house looking for the perfect container to house their latest find.  For a while we tried the cheap dollar store bug houses, but they are always breaking.  We decided to make our own version that will last all summer.

We used an old window screen, a clear recycled container with a screw top and some colorful duct tape.

With a sharp utility knife, cut a square hole in the top of the container.  Cut the window screening just larger than the hole and use duct tape to secure everything.

Our recycled bug house worked great.  The bug gets all the air it needs through the window screening.  The screw top allows kids to add and remove bugs/ bedding as needed.  Plus the kids can observe the bug all they want through the clear plastic.  As an added bonus no more trips to the store buy flimsy bug houses.  Perfect!

Annika collected this little guy to surprise Bree.  So cute!  Annika searched all over the yard for the perfect bug to give her sister.  I think that it was the color of this little guy that made her finally decide to choose him.  Too funny.  I think that we might need to invest in a native bug book to help  decode all the little wonders living in our back yard.

This spring has brought an usually large quantity of little caterpillars to our yard.  Not that long ago, Bree(our bug lover) was outside watching the caterpillars float in on silky strings.  She was loving it.  We were then informed that our chickens needed to stay in their coop for a few days to give the caterpillars a chance to find a hiding place.  I love how little kiddos think.  When the other 2 kids asked what about all the wild bird, she quickly answered that she no longer liked “tweety” birds if they were going to eat her caterpillars.  She decided that she was going to protect these little guys, and stood outside for as long as she could keeping the wild birds away from our yard.  SO funny!

Do you have any bug lovers in your house?

I was so excited when I came across every easy to follow video on how to finger knit.  I remember doing something similar to this as a kid, but we used a spool instead of our fingers.  The short trip to the cabin was the perfect time to teach the kids this simple skill.  Plus I love that all that is needed for this project is a some yarn.  No mess, no crazy supplies to remember, just a bit of yarn.  If you have been reading my blog for a while, you will know that I LOVE the captive audience of my kids all buckled in.  Crafts, games and projects are already staples for family road trip activities,  but I am super excited that we have added knitting to our growing list!

 Finger knitting is SO simple, that the kids picked it up right away.  Since it is very repetitive, the kids enjoyed knitting while listening to a story, watching TV, talking with friends, and sitting in the car.  This is a great project for kids to settle down with and it is wonderful for dexterity.  Also I love that it is really portable and all you need is a little yarn.

I love that the kids are fresh out of the shower, all snuggled by the fire knitting:)  Before the weekend was over, we had piles of wonderful strands of finger knitting.  Since it is so quick and easy, make sure to have LOTS of yarn on hand.  Knowing that now the kids are hooked and the pile is only just going to keep growing, I HAD to figure out what we were going to do with it all.

The first project that we created with the pile of knitting was a jump rope.  The girls were really excited to see how it worked.  Since the yarn is lighter than a regular jump rope, we added a few strips of masking tape wrapped around the center to give it some weight.  It might not be the best jump rope, but the kids loved it.  Since it was created from yarn, it was perfect for indoor use.  Who doesn’t love a little rainy day, indoor jump rope play;)

We created so many cute things from the kids knitting that I can’t wait to share with you.  Although, it will have to wait for another post:)  Happy knitting!

I found this great post on how to grow celery and we had to try it.  We have a small backyard garden and we love to grow our own food.  We have never tried growing celery before because it seemed too fussy.  We always have a celery stock in the fridge, and until now the base has been simply discarded to the chickens.  No longer!  The base of a store bought celery is what this experiment uses, which means this experiment is basically free.  Love that!

Simply chop the base from the celery stalk, leaving about 2 inches.  Place it in a dish of water in a sunny location.  It sounded easy enough and really too good to be true.  I’m sure this is NOT necessary, but the kids enjoyed spraying the celery with water.  What ever works to keep them interested right:)  Notice how yellow the center leaves are.  That is the area that we will be watching for growth.

Things start changing rather quickly.  After just a couple days in the water, our celery’s center leaves started growing slightly.  No roots were visible yet.  The kids were amazed that it was actually growing (and so was I!).

After just 1 week, the center leaves were changing color and starting to poke up a little bit.  There were still no roots that we could find.

Since our house does not have wonderful sunny windows for growing plants.  So we resorted to creating a mini green house, and taking the celery outside.  The weather is warming up, but it is still cool outside at nights.  The inverted plastic box helped to regulate the temperature and keep it moist.  Notice all the moisture on the side of the container.  This is also a great way to start seeds, but just make sure you are checking on your plants/seeds, so they don’t get too hot or dry out.

The celery that is growing, has been in the water for three weeks.  We should have already transplanted it into soil, but oh well some day soon.  I am amazed at how little attention these little plants need.  Which is perfect for our house:)  The “new” celery base was just added to the water yesterday.  There is no growth yet, but it will happen really quickly!

We finally transplanted our little celery and he is so happy!  I am curious how long it will take before our little celery plants are ready to be eaten.

Here are a few helpful tips I found when searching for information about growing celery.  Celery does not grow well in hot conditions, so make sure you give your celery plant adequate water.  If your plant does not receive enough water, it will become tough and stringy.  YUCK!  Hope I can keep this little guy hydrated!

Also, know that it is possible to remove only a few stalks at a time rather than harvesting the whole plant. When doing this, make sure you remove the outer stalks first and let the less developed inner stalks continue growing. Take care not to damage the rest of the plant if removing individual stalks.

The kids love snacking on celery, so we are really excited to see how it tastes!  They think it will be AMAZING to run out to the garden and “sneak” a celery stock.  There is something about growing your own food that is really satisfying!

Bree is well on her way to surpassing my sewing skills.  She really wants to learn to sew her own clothes.  Love that, but one step at a time.

Now that Bree has worked on her sewing basics, she was ready to move onto something more fun.  I found this EASY quilt tutorial through Pinterest and knew that it would be a fun project for her.  She wanted to sew something special for her new little cousin, and this was perfect!  This simple quilt uses only straight stitches, and once you are finished with the top, all that is left is the binding.  Love that!  Quick, easy and cute all in one.

Bree picked out a cute color scheme of “grizzly bear brown” (for her Uncle!) and coordinating girly flannels.

Check out this video for detailed instructions, but here is a quick overview of what we did.  The fabric you will need is…

(2) 1 yard cuts of flannel to make the top and back.  (Eventually cut into a 36″ square)

(5 different coordinating fabrics) 3 1/2″ x 45″ strips.  You will eventually cut each strip into 3 1/2″ squares.

(1) 1 yard of batting

Make sure to buy a bit of extra fabric for each cut, the fabric with shrink when washed.

The grid is  4 1/2″ square, where we centered the cut fabric squares.  We used a piece of chalk to grid our lines.  It was fun to watch Bree lay out her quilt.  It was very important to her that it was not a perfect pattern, but also that no 2 alike squares were too close.  Love it!

Once the quilt was all planned out, we used a glue stick to secure the fabric temporarily.  I loved this step since there was no pins for Bree’s fingers to get pricked on.  They suggest to use a fabric glue stick, but we just used a washable paper glue stick and it worked perfectly.  We were careful to keep the glue in the center of each square so we didn’t have to worry about sewing over it.

Next we sandwiched the top, batting and bottom.  Bree sewed straight lines down each side of a line of squares.  Then turned the fabric a quarter turn and sewed down the other sides of the square.  Notice my favorite feature of this sewing machine for teaching little ones…the speed adjustment.  We set it on a slow speed so that no matter how hard she pushed on the pressure foot, she could only go too fast.  No sudden speed bursts that can scare our beginner sewer.

I helped by holding the extra fabric.  It had a tendency to slip off the table and pull the quilt wonky.  Bree finished this quilt in an afternoon.  She was so determined to finish it and so proud that she was able to sew it all her self!  We added turquoise binding strips.  This is not necessary, but I love how it turned out.  This was the only part of the quilt that she needed help sewing.

Bree could not wait to see what her baby cousin thought of it!  So sweet!  She also enjoyed showing it off to anyone that stopped by.

Once this quilt is washed a few times it should “fray up” and look similar to a rag quilt.  I’m sure that Bree will be asking to sew another quilt soon, only this time on a larger scale for her.  I am so proud of our little seamstress.  Great work Bree!  

My kids love launching things into the air.  We made these simple catapults a while ago to launch packing peanuts.  When we were asked to build some simple catapults for a group game, the kids were really excited.

These little wooded catapults are so easy to build, and were also able to use left over wood from another project.  Love that!  Simply measure and cut a 1 x 4 32″ long and a another piece 3 1/2″ long.  Next cut a 2 x 4 to 3 1/2″ long.  Once you have all your pieces cut, screw both the 3 1/2″ pieces 8 – 10″ from one end.  Done!  Now your ready to launch.

Notice that the front catapult had 2 2x 4′s as the base and the back catapult uses a 2×4 and a 1×4.  Play around a bit to see which works best for you.  The kids liked the one made with the1x4.

Simply find something small items to launch, stomp on the end and watch it fly.  Smaller items like marshmallows, microfilm canisters, soft toys etc all worked great.

I love her look of determination!

The kids enjoyed both launching and catching the flying objects.

Yes, your seeing correctly.  My husband and a good friend decided to take launching small items a step further.  They built a small fire ball and sent it flying.  I’m sure you are wondering what they were thinking, well I can’t answer that question;)  Although since I knew the fire launch was going to take place, we made sure we had plenty of water on hand and waited for a wet rainy day.

It was pretty amazing to see how far and high the fire ball went.  It looked like a comet flying through the air.  Even though this was pretty amazing to see, we will be sticking to safer items to launch in the future.  Hope you enjoy building and playing with these easy to build catapults!