Packing Peanut Play

What to do when you score 2 giant bags of packing peanuts for FREE!

Craigslist is a great place to look for free packing material.  I scored this set from a local health food store.  This bag was full of 2 different kinds of biodegradable packing peanuts and a few Styrofoam ones at the bottom.  LOVE IT!

The kids love playing in the peanuts.  I filled a large under the bed storage container with them and the kids had a blast.  Even my “big” ones loved jumping in.  I left this up for a few weeks, defiantly a hit!

Notice the cute colored people that Bree is holding.  The girls really enjoyed coloring their packing peanut creations, so cute!

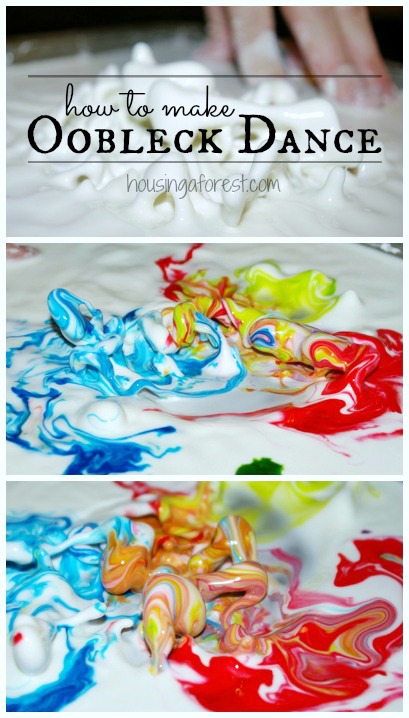
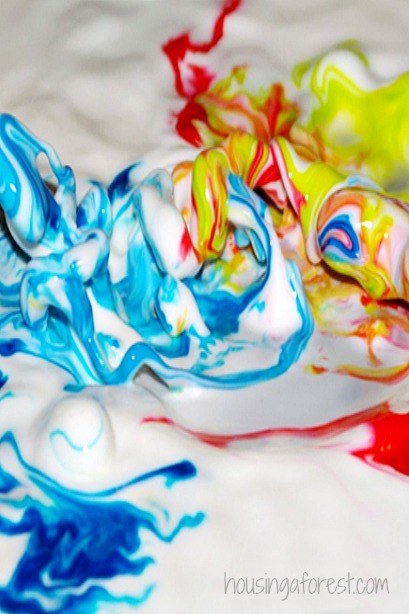
Cornstarch packing peanuts do wonderful things in water.  We decided to conduct an experiment to see how many cups of packing peanuts would dissolve in 8 cups of water.  Kaleb made the chart and wrote down all our guesses.

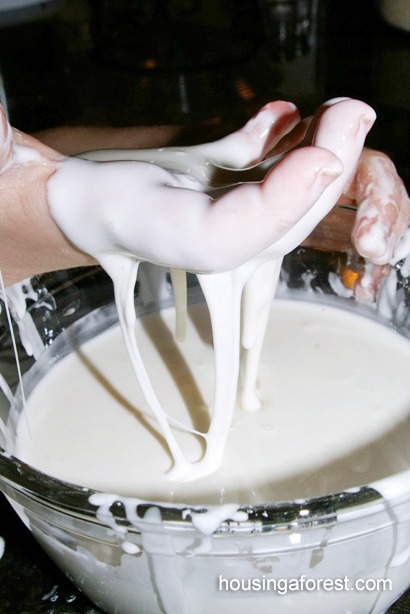
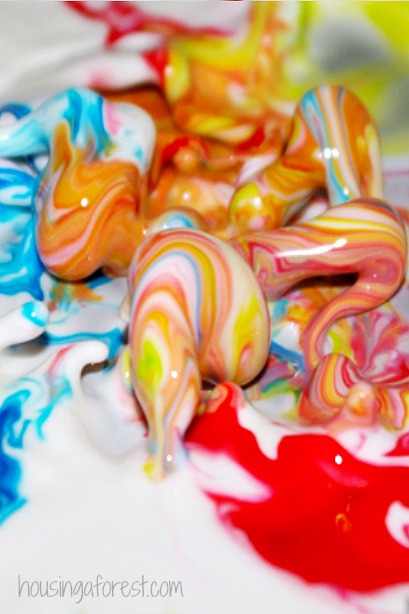
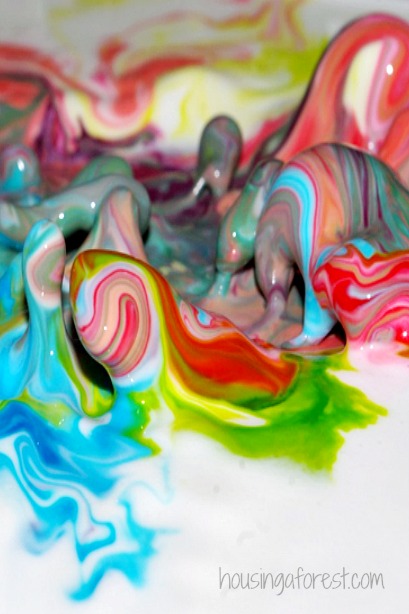
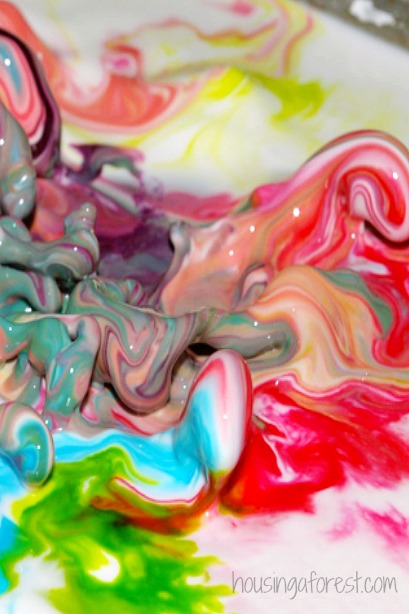
We started out shaking the jar, but soon realized that we were creating too much foam.  We ended up mixing them in with a spoon which seemed to work better.  The end result was amazing.

We ended up being able to dissolve 135 cups of packing peanuts in 8 cups of water.  I am convinced we could have kept on going if our container was bigger.  It takes very little moisture to break them down.

Next we created wonderful structures.  Simply dip your finger in water, touch it to the packing peanut and then press 2 peanuts together.  The kids had a blast doing this.  You can buy special packing peanuts at kid learning stores, but these free peanuts work the same way.  You can also purchase packing peanuts at office supply stores.  Hours of endless fun building and creating.

After they finished building they had this great idea to see how fast it would take to dissolve in water.  I was excited that they wanted to dissolve it because I was getting worried that I wold have to fit this wonderful structure in with my spring decorations:)  If you look closely you can see a man (no face), a giraffe, a large spider and a creeping Caterpillar.

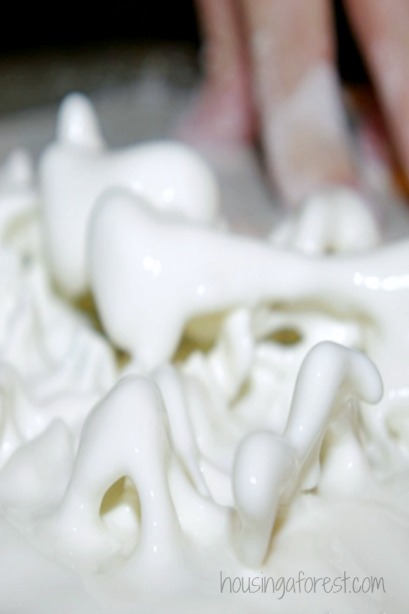
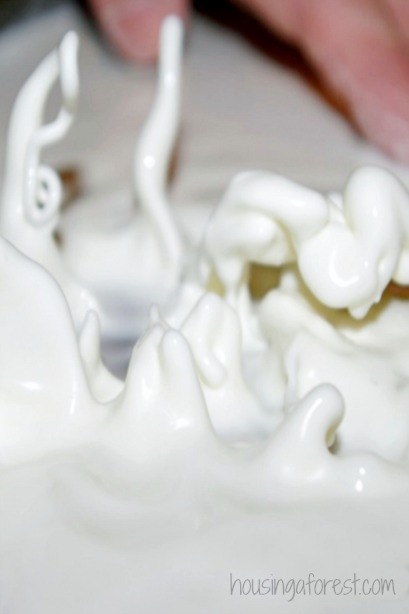
Squishing slimy, gooey packing peanuts.

Kaleb enjoyed making flying “worms” by squishing his hands together.

Next the kids wanted to know what the difference between the Styrofoam and biodegradable peanuts so I set up another experiment.  The jar on the right contains the biodegradable peanuts and the jar on the right is the Styrofoam peanuts.  After some fun shaking the kids noticed that there was no change in the Styrofoam jar.

Since the Styrofoam peanuts don’t dissolve in water they are perfect for using as beanbag filler.  They are larger than the regular bean bag filler, but the kids don’t mind and it squishes down pretty quickly.  The perfect cheap fix to fluff up those flat beanbags.  Simply unzip the beanbag cover, there is usually 2 zippers and dump in the styrofoam packing peanuts.  It is important to make sure you are using Styrofoam.  If your beanbag ever gets wet, you would end up with a sticky gooey mess with the biodegradable variety.

Grab your sunglasses, your favorite book and go enjoy the spring sunshine!

All this play took place over a few weeks.  The kids love it!  We are giving the leftover peanuts to my sister-in-law to use in her preschool classroom sensory table.  When I was picking up the bags, I’m sure the lady thought I was nuts.  She was probably thinking “who wants 2 large bags of packing peanuts and 2 large bags of bubble wrap?”  I do!  She defiantly blessed our house!  Now what to do with all the bubble wrap!  LOVE IT!

Here is a link to a fun list of great experiments that my kids love.

I will be linking to these parties.

Spring Oil Pastel and Watercolor Resist

Spring Art Projects for Kids ~ Oil Pastel and Watercolor Resist

Are your looking for a simple spring art projects for kids to create?  My kids made these sweet spring animals using oil pastels and watercolors.  I love the little bunnies and chicks.   You might be surprised to learn how easy they were to make.

spring art projects for kids ~ Oil Pastel and Watercolor Resist

Each of my kiddos decided to draw spring animals and they did a quick sketch with pencil.  Normally I don’t like sketching first since it adds an extra step for the kids and eliminates some of the spontaneity of the piece.

spring art projects for kids ~ Oil Pastel and Watercolor Resist

Next, they colored everything in with oil pastels.  I love working with oil pastels.  They go on creamy, and are easy to color with.  Bonus, they come in wonderful vivid colors.  The purpose of of this step is to create texture, so it is better not to color every space of the the paper leaving white space for the watercolor to highlight.

Once everything was fully colored we outlined the drawing like a coloring book with a black oil pastel.  I love this look, especially with kid art!  I helped outline some of the detailed areas since the pastels are a bit thick for little fingers to do detail work.

spring art projects for kids ~ Oil Pastel and Watercolor Resist

The kids then did a quick wash of watercolor over the entire piece.  The oil pastel will resist the watercolor creating a wonderful texture.  The kids matched the watercolor to the oil pastel color.

spring art projects for kids ~ Oil Pastel and Watercolor Resist

We touched up the black oil pastel after the watercolor wash.

spring art projects for kids ~ Oil Pastel and Watercolor Resist

So simple and cheery!  I love it!  I framed these cute little art pieces in frames that I found at the thrift store.  I painted the frames white and sanded the edges to reveal glimpses of their original green color.  There is nothing better than original art work your kids created to personalize and brighten a space.

spring art projects for kids ~ Oil Pastel and Watercolor Resist

For more Spring Art Projects for Kids, check out our:

 Spring Cherry Tree

Carrot Handprint Art

Rainbow Marble Painting

Georgia O’Keeffe Flowers

Spring Fingerprint Tree 

Spring Snowmen

Snow again!  At least it is warm and the perfect temp for building snowmen.  This is what the kids created on our back steps yesterday.  Cute little spring snowmen!

They used the snowball maker to create the body, and snipped apart the remains of out winter planter for the eyes, nose and mouth. I love how these mini snowmen turned out, especially their hats!

If you don’t want to miss out on any of the fun we are having at Housing A Forest, make sure to follow us on PinterestFacebook and Twitter.

Spring Subway Art

I love all the subway art that is being posted everywhere.  I finally got around to creating my own version.  I started with the foam letters that seem to be found in every corner of our home.  They have a cute basket that they are suppose to be contained in, however the little ones find them irresistible and carry them around.

The kids helped to sort out all the letters, finding as many different fonts as we could.

Then we sorted them into spring words and stuck them onto the back side of a piece of mat board.  I just eyeballed where each letter should be placed.

I then used Gesso to prime the letters and add a bit of texture.  Gesso is a great painting medium that can be found at art and craft stores.  It is a thick primer that can be used on most surfaces.  Since Gesso is thick, it is great for making messy brush strokes and creating texture.  I spray painted the frame white while I was waiting for the Gesso to dry.

Once everything was dry, I sanded the edges of the picture frame.  Then mixed up a brown glaze using brown acrylic paint and glazing medium.  I glazed both the picture frame and the letters by brushing on the glaze and gently wiped it back off with a damp rag.  I let the glaze sit in the groves and wiped most of the glaze off the flat areas creating texture and depth.  I then glazed back over the letter with white to add some highlights.  I love how it turned out!  You would never know that these are kid foam letters.

I will be linking to these parties.

Dancing Oobleck

How to make Oobleck Dance ~ Science Experiments

My kids love trying new Science Experiments, and play recipes.  Today we decided to combine the 2 and try to make our Oobleck dance using sound waves.  If you have never made it before, Oobleck is a mixture of cornstarch and water.  When played with fast it acts like a solid…when allowed to relax it acts like a liquid.

How to make Oobleck Dance ~ Sound Science Experiments for Kids.

This post contains affiliate links for your convenience.

When we saw a few youtube videos that involved Dancing Oobleck, we decided we needed to take our gooey play to the next level.

How to make Oobleck Dance ~ Sound Science Experiments for Kids

Dancing Oobleck Recipe

You will need to make your Oobleck thicker than usual.

How to make Oobleck Dance ~ Sound Science Experiments for Kids

Materials Needed:

Once your recipe is ready let the kids play for a bit while you set up the next step.

  • Subwoofer
  • a thin metal cookie sheet
  • a MP3 of an audio test tone ~ you will have to play a bit to see what works best with your equipment.
  • Food Coloring

How to make Oobleck Dance ~ Sound Science Experiments for Kids

Instructions:

  1. Place the cookie sheet onto the speaker of the sub, and pour in the Oobleck.
  2. You can download different test tones and play to see what works best for you.  We used 40 Hz, 50 Hz, and 63 Hz, and found that we needed to turn the volume way up.  We tried a number of different frequencies but these three seemed to work the best.  We did a search for subwoofer test MP3.  There are a number of different sites that you can use.
  3. Before you play the MP3 you will need to place your fingers on the edge of the cookie sheet with gentle pressure.  It took a bit of playing to see what worked the best, but the results were amazing.

How to make Oobleck Dance ~ Sound Science Experiments for Kids

We decided to add food coloring to see what would happen.  I love how the colors dance together and you can see all the layers of each color.  This was the kids favorite part!

How to make Oobleck Dance ~ Sound Science Experiments for Kids

Amazing!

How to make Oobleck Dance ~ Sound Science Experiments for Kids

Subwoofer Test:

Here are a couple options for subwoofer tests although if you do a search for subwoofer test MP3 or MP3 of an audio test tone.

How to make Oobleck Dance ~ Sound Science Experiments for Kids

Tips and Tricks:

  • A thicker consistency of Oobleck works best.  Although with that said you don’t want it too thick.  We used a ratio of 2:1 (cornstarch to water).
  • If your oobleck is not dancing, you may need to change the volume on your subwoofer.  You can also try digging your finger in Oobleck to start the movement.  In the video the kids do it a few times just to get everything started.
  • Keep experimenting until you get it to work.  Honestly we played around for a bit until it worked for us.  Everyone will be working with different equipment so what worked for us might be a little different for you.

How to make Oobleck Dance ~ Sound Science Experiments for Kids

After we were all done I let the kids play with the colored Oobleck.  They loved it, but a word of caution if stained colored fingers are not your thing.  We giggled at the kids as they tried to wash the color off.  I’m sure they will be sporting grey blue hands for a few days.

For more great experiments, check out our:

Walking on Eggs

Ivory Soap Experiment 

Packing Peanut Experiments

Exploding Peep Geysers

Shooting Water Experiment