DIY Paper Climber

I found these cute climbing toys on Just Deanna, a fun crafty blog.  These cute little toys work much like the wooden climbers, but are SO easy for kids to create themselves.  They are so simple to make and the kids had fun learning how to make them climb and then racing with them.  This is a fun toy to make when talking about friction.


Materials:

  • sturdy paper.
  • a penny.
  • one straw cut into 2 lengths that are each about 2″ long.
  • tape.
  • string or yarn that is cut to about 6′.
  • 2 beads for the ends of the string

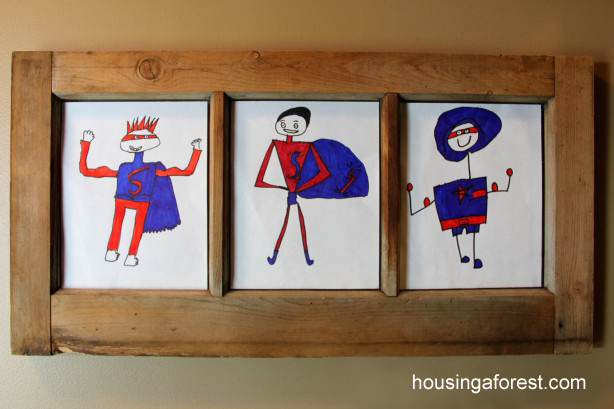
The construction is really simple.  Draw something fun on sturdy paper and cut it out.  Next tape 2 parallel drinking straws about 2 inches long onto the back.  You will also need to tape a penny onto your drawing to add weight.  Once you have everything taped on, thread your string or yarn up through the bottom of one straw and down through the top of the next straw.  Your string should be about 6′ long.  Tie a cute button or bead to the bottom of each string to keep it from slipping through the straw and needing to be re-threaded.

Hook your little climbing toy over a door handle or a hook.  Use a simple see-sawing motion to gently guide your climber to the top of the string.  My kids also found it helpful to hold their hands slightly apart while they were gently see-sawing on the strings.   These little guys climb from the friction between the straw and the string.

We did have one of the strings break, I think from the friction.  It was easily fixed with another piece of yarn (because that is what we had on hand), but next time we would probably use a sturdy string.

This is a really simple toy to make.  Our kids loved creating these silly climbers, and they really enjoyed racing them.  It was funny listening to them create stories about each of their climbers.


Water Bottle Popper

We were at a beach with some friends and one of the Dads showed Kaleb a cool trick.  Kaleb was amazed when he shot the cap of a water bottle about 20 feet in the air by simply twisting the bottle.  Nothing special is needed, just an empty water bottle and some muscles.  Kaleb thought this little water bottle popper was the coolest thing.  Now he is constantly on the hunt for recyclable water bottles.

It is tough to get the bottles to start twisting.  Younger fingers will have a really hard time, so it might be best to just let them watch.  Please be cautious when trying this.  The cap will shoot off like a rocket, so make sure it is pointed in a safe direction!

Keep twisting the bottle until it won’t twist any further.  The twisting builds pressure in the bottle, so the tighter you twist it; the higher your cap will shoot.  We never had any of our bottles pop while twisting, but it is possible for this to happen.  Please be careful.

Check out how clear the bottle is at this point.  Once the bottle can no longer be twisted any further, slowly open the cap.  It will eventually reach a certain point when the cap just shoots off.

Notice the vapors coming out just after the cap shoots off, and how cloudy it is inside the bottle.

Water Bottle Popper

I don’t know the exact science behind it, but it is because of the pressure that is built up inside the bottle.  I would love to hear the explanation for why this happens.

Some of our caps shot about 20 feet in the air so be prepared.  We found some brands of bottles work better, so you might have a bit of trial and error.  Be safe, and have fun!

Here is a link to a fun list of great experiments that my kids love.

Summer Activities

Summer is here!  Our whole family looks forward to the last day of school.  I love having the kids home and the busy schedule of summer.  Let the summer activities begin!   Our kids love to be creative and doing projects.  Here is a list of some of our favorite summer activities that we have done in the past.  Click on the title to take to to the specific post.


    Rainbow Bubble Snakes

Help your kids create their own bubble wand from recycled material, and then let the fun begin.  They will LOVE blowing these wonderful sock bubbles, and having bubble snake wars.  Add a little food coloring and they will create magical, colorful bubbles.  This was a huge hit in our house.  We saved the bubble wands to play again soon.

Recycled Bug House

These cute bug houses come straight from your recycle bin.  This the perfect importunity for your kids to do a bug study and observe the critters living in your back yard.

 Frozen Yogurt Dots

These frozen yogurt dots are the perfect summer treat.  These little healthy dots are easy to make, plus they taste AMAZING!  We use Greek yogurt, but you can be made with any yogurt that your family prefers.

DIY Sprinkler 

This is a great way to cool off this summer.  This kids will enjoy building their very own sprinkler using recycled materials.  Easy, cheap and fun!  We made this sprinkler last year, used it all last summer and it is still working great today.  I love that it was free to make, and it is still the kids sprinkler of choice.

Travel Time Line

Help your kids create a fun Travel Time Line for your next road trip.  Encourage them to draw pictures of what landmarks they will see along the trip.  It will help keep all the “how much further” questions at bay and the kids will have fun moving your car past each landmark.  This little activity will help pass the time on those long car rides.

Road Trip BINGO

Road Trip BINGO is a great way to pass the time on those long car rides.  There are 8 different printable sheets, so each person in the car can have a unique playing card.  Simply print each of the PDF sheets of and laminate them.  This will create a slick surface and make them reusable.

Simple Catapults

Help your kids build these simple catapults out of scrap wood, and have fun launching small objects.  These are so simple and quick to make.

Frizzy Barbie Hair Salon

This is a great rainy day activity. Have the kids set up a simple Barbie salon and help detangle her hair.

Hope that you can find some fun summer inspiration. I would love to hear what is on your summer creative list.

Super Dad

Happy Fathers Day!  This is a great time to show your special Dad how much you love and appreciate all he does.  Our kids love giving gifts, but since they don’t have unlimited funds they have to get creative.  After a bit of thinking, they decided to write a poem all about their Super Dad.


I love this little poem that the kids came up with.  They all made poems at school this year, and decided to make one all about Dad.  It was so cute to listen to them figure out which rhymes were the best.  They were so excited about it, that they gave it to him early.  There was lots of cute giggles as Chuck was reading it.

Super Dad ~ Happy Fathers Day

Since they were going with a Super Dad theme, I had the kids also draw what they thought Dad would look like if he was a super hero.  They turned out so cute!  I especially love Annika’s with the Halo cape and bulging muscles.

I found the idea for this post at Alpha Mom.  Since I missed getting a picture of our Super Dad package, make sure to check out her post.  We used her printable labels as well.  However, instead of Blue and yellow we stuck to our blue and red Super Dad color scheme.  They turned out so great!  I love all the inventive names and descriptions that go along with each item, her attention to detail makes them so special.

Hope you have a wonderful Fathers Day!

Finger Knitted Accessories

Easy Finger Knitting Ideas for Kids

The girls are still enjoying making things from their finger knitting.  Although, now that summer is in full swing the piles of finger knitted “snakes” have slowed down.  They have enjoyed teaching a few of their friends how to knit as well.  Love it.  They are now on a mission to find fun yarn at garage sales.

Headband ~ Finger Knitting Project

The girls wanted to turn their piles of knitting into something that they could wear.  This cute little headband turned out so great, now all it needs is a chunky button to the center.  They were so excited to wear a headband they created!  Plus it was so simple to make.

Headband Instructions:

  • Use 1 length of finger knitting that is long enough to be loosely wrapped around the head twice.  You will want it loose so that you have a little room to tie the ends together.  (Sorry for the lack of exact measurements, but each head will be different.)
  • Since the weave of the knitting is very stretchy, make sure when you tie the ends together, it is smaller than your head.  You don’t want it slipping off.

How to make a Finger Knitted Flower:

  • The flower was created by using another length of finger knitting.  We chose to use the same color of yarn, but it would be cute in a contrasting color.
  • Simply form tiny loops with the finger knitting to make the petals.
  • Continue working around in a circle until the flower is filled with loopy pedals.
  • Use a length of yarn to wrap around the center of the flower and tie to secure.
  • The tail of the knitting can be used to tie the flower to the head band.  A simple knot will work.

Finger Knitted Necklace:

  • The necklace was created using the same techniques as the headband.
  •  Use 1 length of finger knitting that is long enough to be loosely wrapped around the neck twice.  We chose to have one loop longer than the other.
  • Tie the ends together.
  • Tie on a contrasting flower and your all set!

I love how they turned out and the girls are so proud of their handiwork.

For more Finger Knitting Projects, check out our:

How to Finger Knit

Finger Knitted Ghost Garland

Finger Knitted Valentines Decor