Snowman Painting ~ Winter Art Projects for Kids

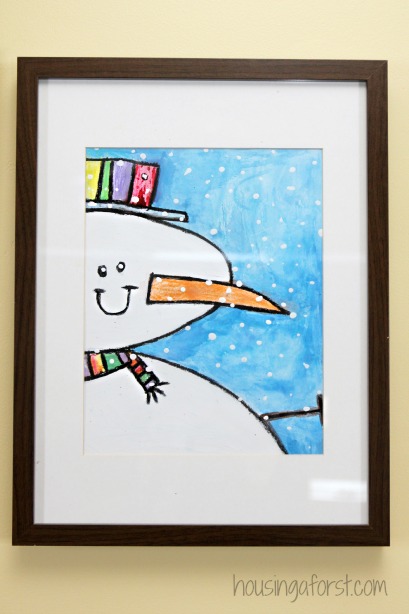
Close-up Snowman Art Project for Kids ~ Winter Art Projects for Kids

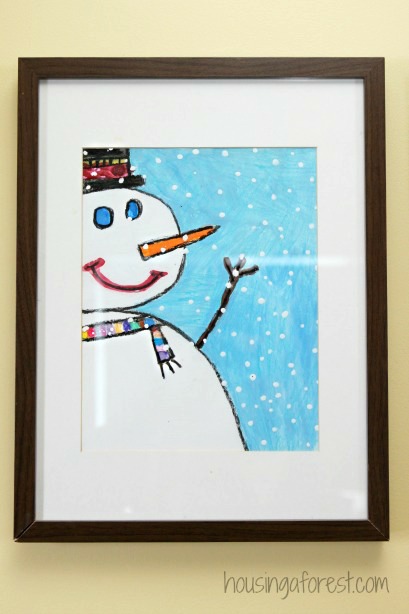
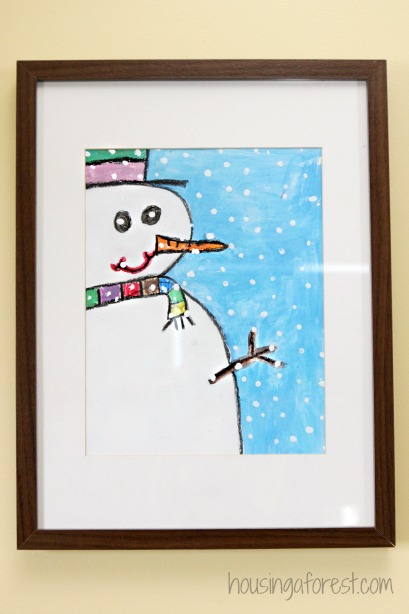
There is something about snowmen that just make me want to smile.  We have created so many snowman crafts and activities just because of my love of them.  Traditionally, kids  use 3 graduated circles when drawing a snowman.  So we decided to switch things up with this simple art project, and tried to encourage the kids to think outside the box.  Isn’t the closely cropped composition adorable?

winter art projects for kids ~ Snowman Painting

This post contains affiliate links for your convenience.

The kids made these adorable snowmen a while ago for their Grandparents (now I need them to make me a set).

Materials we used:

winter art projects for kids ~ Snowman Painting

How to Draw and Paint and Snowman:

  • I talked to the kids about cropping and perspective as they were creating their initial composition.  I will admit, it was a bit of a challenge at first, but they caught on quickly.
  • Once they were happy with their initial drawing, they used oil pastels to color in the background and highlight the details.  I love the look of watercolors painted over oil pastels.  If you are looking for a more in-depth explanation of the process, check out our Spring Oil Pastel and Watercolor Resist.
  • The Snowman was then painted using layers of white tempera paint.
  • Once their paintings were dry, they added snowflakes.  They use white tempera paint and a Q-tips dotted all over their paper.  It looks just like the snow is falling.

winter art projects for kids ~ Snowman Painting

Our little Snowmen were inspired by one of my favorite art sites Deep Space Sparkle, if you haven’t visited her site yet, I highly encourage you to!  It is PACKED full of amazing art inspiration and tutorials.

winter art projects for kids ~ Snowman Painting

Looking for more Process Art for Kids, check out our:

Compass Painting

Painting on Wet Glue

Microwave Puffy Paint

Credit Card Art

Easy Valentines Play Dough Recipe

Valentine’s Play Dough Recipe ~ Best part…it Smells and Feels AMAZING

We love making homemade Play Dough.  It only takes a few moments to whip up, and the kids love helping.  This time we decided to throw together a simple Valentine’s glittery batch the the kids loved.  Plus it smelled amazing!

Easy play dough recipe ~ Smells and feels AMAZING

This post contains affiliate links for your convenience.

Our reduced salt play dough recipe is always a hit.  However, this time we decided to kick it up a notch.  We have been making Kool Aid play dough for years, but this is the first time I’ve shared it with you.  Your kids are going to love how it smells! (scroll down for the recipe).

Easy play dough recipe ~ Smells and feels AMAZING

I always keep packets of Kool Aid in our art cupboard.  Yep, you read right.  Seriously…Kool Aid is one of my favorite secret art weapons.  Have you seen our Kool Aid Pumpkins, or tried our Kool Aid Easter Eggs?  Both a huge hit in our house!

Easy play dough recipe ~ Smells and feels AMAZING

Kool Aid Play Dough

The kids loved how this simple play recipe smells.  Grape and cherry Kool Aid created beautiful Valentine’s color and smelled great.  I also love that it is so inexpensive.

Easy play dough recipe ~ Smells and feels AMAZINGKool Aid Play Dough Recipe:

This recipe is super easy to make, and smells AMAZING!  Plus it feels very similar to store bought Play Doh.

  • 1 cup Flour
  • 1/4 cup Salt
  • 2 tsp Cream Of Tartar
  • 1 cup Water
  • 1 1/2  or 2 TBSP Vegetable Oil ~ I have used both measurements successfully and love how soft it makes the dough feel.
  • Packet of Kool Aid ~ We used Cherry for the 1st batch & Grape for the 2nd.
  • Glitter ~ Optional, but always fun!

Easy play dough recipe ~ Smells and feels AMAZING

Easy Play Dough Instructions:

  • Mix ingredients together in a sauce pan ~ I usually mix the dry ingredients and add the wet ingredients separately.  However, you can just dump everything together and mix.
  • Stir until your mixture looks like cake batter…a few lumps are fine.
  • Cook over medium heat.  Make sure to stir constantly.
  • The mixture will thicken…continue stirring.
  • Once the mixture forms one large “clump” (I’m sure that is the technical term) you are good to go.  Simply remove the dough from the heat, and knead a few times by hand.

Caution…cool before little fingers play with it.  It will be very hot at this point.

This recipe makes about 2 cups of Play Dough.

Easy play dough recipe ~ Smells and feels AMAZING

Looking for more Valentine’s Ideas?  Check out our:

10 Heart Stamp Activities

7 simple Heart Animals

15 Origami Hearts

Paper Strip Valentines

Easy Cross Craft for Kids

Easy Easter Craft for Kids ~ Painting with Chalk and Water

Today we are revisiting a a super easy activity…painting with chalk and water!  Did you see our super easy Wet Chalk Drawing activity?  We love simple ideas that use things we already have at home.

Easy Cross Craft for Kids  ~ Easter Craft

Chalk is a versatile drawing medium.  We love drawing on sidewalks, chalkboards, paper and wood chips.  For a simple twist on a classic activity…just add water.  The texture of the chalk changes and if feels almost like you are painting.

Easy Cross Craft for Kids  ~ Easter Craft

This post contains affiliate links for your convenience.

Materials Needed:

Easy Cross Craft for Kids  ~ Easter Craft

Soak your chalk in a bowl of water.  Use the tape to create a cross shape on your paper.  encourage the kiddos to use the wet chalk to paint/color colorful designs on their paper.

Wet chalk has a consistency similar to paint and the colors will appear richer and deeper than dry chalk.   You kids will be intrigued when it glides smoothly across the paper leaving a beautiful thick paste.

Easy Cross Craft for Kids  ~ Easter Craft

Allow the chalk and paper are dry before gently removing the tape.  Wet paper rips easily, so try to remove the tape slowly to minimize and tearing.

Easy Cross Craft for Kids  ~ Easter Craft

This simple activity is perfect for kids of all ages.  Preschoolers right on up to school aged kids.  There are so many possibilities for what they can create.

Easy Cross Craft for Kids  ~ Easter Craft

I love how these simple drawing turned out!  Perfect for Easter!

Easy Cross Craft for Kids  ~ Easter Craft

Looking for more Easter Crafts for kids?  Check out our:

Paper Plate Sheep

Egg Carton Cross

Easter Borax Crystals

Funny Bunny Faces Game

Adorable Easter Chicks


Easy Valentine Card Holders for Kids

Creative Valentine Box Ideas ~ for School and Home

My kids love Valentine’s Day, especially their school Valentine Day party.  Last year, we made 3 simple and adorable Valentines box and Valentine card holders for them to gather their Valentine’s cards in.  Read on to find out how to make your own.

Easy Valentine Card Holders for Kids3 easy to make Valentines Box holders

If your kid’s school is like ours, the kids are responsible for bringing in their own box/bag to school for collecting Valentine cards. We dug into our recycle bin and got a little creative.  The kids LOVED the results, and they were so easy to make.

Ladybug Valentines Card Holder:

This adorable ladybug will love devouring your kids Valentines Cards!  Perfect for creating with your little “love bug”.

Easy Valentine Card Holders for Kids

Materials needed:

  • Oatmeal Container
  • Black Pipe Cleaners
  • Black and White Felt
  • Red Paper
  • Red Ribbon
  • Hot Glue Gun

We started by wrapping a recycled oatmeal container in red paper.    We then cut out various sizes of felt hearts that were attached to the pipe cleaners with hot glue.  The pipe cleaners were then attached to the container with a small felt hearts and hot glue.  The kids also embellished with large eyes and numerous heart shaped spots.  Finally, I helped the kids cut a rectangle in the lid so all the Valentine cards would fit through and attached a red ribbon handle.  Super easy!

Easy Valentine Card Holders for Kids

Robot Valentines Card Holder:

Store your Valentine Cards in an adorable robot.  We created this adorable little Robot Valentine Box using boxes from our recycle bin, aluminum foil and a few other random items we found around the house.

Easy Valentine Card Holders for Kids

Materials needed:

  • Cereal Box ~ or something similar ~ used for the body
  • Pudding cup cardboard wrapper ~ used for the eyes
  • Ribbon
  • 2 Milk Jug Lids
  • Tin Foil
  • Hot Glue Gun and glue stick
  • Fun Foam or paint ~ optional, but adds a little color to the inside of your robot.
  • String and Brad ~ optional, but works great for adding a little door in the back to retrieve your Valentines.

Start by cutting the opening into the larger box for the Valentines.  (If you were adding the “door” at the back cut that right now as well).  Wrap both boxes with tinfoil and secure with glue.  Attach all the embellishments and add a little ribbon handle.  You could get as creative as you would like with adding buttons arms etc.

Easy Valentine Card Holders for Kids

Owl Valentines Card Holder:

Whoooo, Whoooo loves Valentines Day.  The kids had so much fun creating this simple Owl card holder.  I think my favorite part are the large eyes!

Easy Valentine Card Holders for Kids

Materials needed:

  • Oatmeal Container ~ or something similar
  • Colorful paper
  • 2 Juice can lids
  • Hot Glue Gun
  • Blue Ribbon

We started by wrapping a recycled oatmeal container in colorful paper.  We used a number of different papers in coordinating colors.  We then attached the metal juice lids to the container with hot glue and added a paper beak.  Finally, I helped the kids cut a rectangle in the lid so all the Valentine cards would fit through and attached a red ribbon handle.  Super easy!

Easy Valentine Card Holders for Kids

Are you looking for more Valentines Card Holder inspiration?  Then be sure to check out our 20 creative Valentine Card Holders.  This post is packed full of our favorite ideas from around the web!  {click on the link or the image}

20 Creative Valentine Card Holders

For more creative Valentine Boxes, check out our:

20 of the cutest Valentine Boxes

Super Simple Valentine Box

20 Creative Valentine Card Holders

DIY Mailboxes

Heart Necklaces ~ Valentine Crafts for Kids

Finger Knitting Valentines Craft ~ Heart Necklaces

The kids LOVE Finger Knitting.  It is so easy to learn, and can be taken anywhere.  Love it! We are always on the look out for simple Valentine crafts for kids.  This little heart necklace is totally fits that description.  Plus, the girls favorite part…its created using their knitting.

Heart Necklaces ~ Valentine Crafts for Kids

Materials Needed:

  • Finger Knitting Strand ~ about 8-9 inches.  We found the thicker yarn worked best
  • Hot Glue Gun
  • Jewels ~ You can never have enough sparkle!

Heart Necklaces ~ Valentine Crafts for Kids

How to make a heart necklace:

Start be creating a short strand of finger knitting, about 8-9 inches long.  Check out this simple Video Tutorial on how to Finger Knit.

Heart Necklaces ~ Valentine Crafts for KidsMake sure to leave a long tail on one end.  This will eventually become the necklace “chain”.  Depending on how long you want your necklace, will depend on how long to leave the tail.

Heart Necklaces ~ Valentine Crafts for KidsFold the Knitting in half, and secure with hot glue.  Next fold in the ends of the knitting and secure those with hot glue as well.  The short tail will be hidden right inside the heart.  Tuck the tail of the longer strand inside and secure with glue.

Heart Necklaces ~ Valentine Crafts for Kids Embellish with a little sparkle!

Heart Necklaces ~ Valentine Crafts for Kids


Happy Valentines Day!

Heart Necklaces ~ Valentine Crafts for Kids

For more Finger Knitting Projects, check out our:

How to Finger Knit

Simple Valentines Home Decor using Finger Knitting

Finger Knitting Necklace and Headband

Finger Knitted Ghost Garland