


Earth Day Crafts for Kids
Paper Mache is so easy and really cheap. Which makes it a prefect medium for crafting in large groups. We love creating simple Earth Day Crafts, and quickly feel in love with these simple paper mache globes that glow.
I was surprised by how many kiddos had never tried it before. I think that most of us remember the crazy mess and don’t want to deal with it. The joy on the kids faces as they were creating and dripping the paper mache paste was priceless and made all the mess worth it.
Earth Day Crafts Supplies:
- A small round balloon for each kid.
- Paper Mache Paste ~ recipe below
- A whisk ~ to mix the paste
- 1 shallow container of paste for every 2 kids (this seemed to keep the mess to a minimal since you don’t have kids dripping and reaching over other kids)
- News Paper Strips – ripped into 1″ wide strips
- Tissue paper – ripped into 1 ” wide strips
- A disposable cup and plate for each globe ~ The cup and plate should catch most of the drips.
- A bucket of water and paper towel to rinse and dry hands.
- Skewer – used to pop the balloon when the globe is dry and also to create the holes for the candle to shine through
- Battery operated tea light candle.
Paper Mache Paste Recipe
1 part flour and 2 parts water. Some methods have you boil the paper mache paste, but we had no access to a stove. We just mixed the flour and water together and it worked great! Super easy. No cooking!
To make clean-up go quicker, you can cover the table with a disposable table cloth. Don’t worry about cleaning it after each session, wait until the 3rd day when all the drippy mess is over. Then simply roll up the table cloth and throw it away. We also had a tarp covering the floor.

Start by handing out the plates and have the kids write their names on it. (hint – the names should be on the edge of the plate so it does not get covered by drips) Cup goes face up on the plate, and the balloon sits on the cup. Put the “tail” of the balloon into the cup.
Dip the strips of paper into the paste. Use your fingers to wipe off the excess glue so that your balloon is not dripping and can dry faster. Our youngest age of kiddos was 4. They did a great job, but needed extra help.

Gently lay the wet newspaper across your balloon and smooth out any wrinkles. Keep layering strips until the entire balloon is covered. You will need to let this layer dry overnight. The next day repeat the process of layering more wet newspaper strips and let the second layer dry overnight again. We found ours dried really quickly.

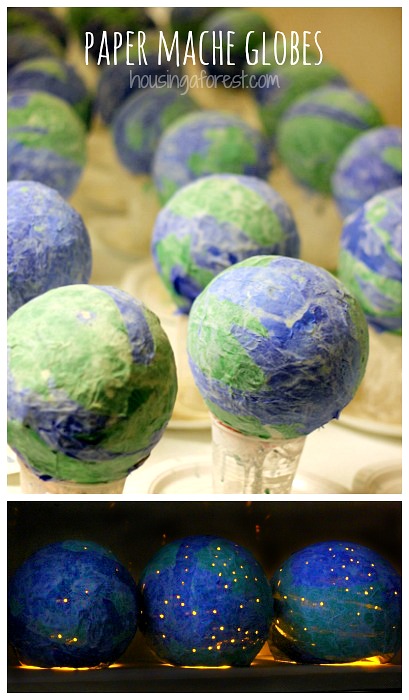
Notice the “tail” of the balloon is still visible. You will need this opening for the globe to sit over the candle, so make sure not to cover the bottom.

Now it is time for the colorful third layer. Since tissue paper is fragile, you can’t dip it into the paste. You will need to use your hands to cover the entire balloon in paste so that it is wet. Most kids LOVED this step. It was very gooey, and drippy but oh so much fun.

Lay the strips of tissue paper gently onto the wet balloon and pat. You may need to smooth another layer of paste on top of the tissue paper to help it stick and smooth out the wrinkles. Just remember to be gentle.

It was definitely messy, but it was so worth it!

All lined up to dry overnight.

Once the globes were dry I handed each of the kids a wooden skewer. They LOVED popping their balloons (pop near the tail of the balloon that is still exposed and not covered in paper mache. I had a number of kids try to pop the balloon through the paper mache).
Once the balloon was popped, put your hand inside the balloon and gently poke holes in the globe. The larger the holes, the more light the candle will give off when turned on.

A few kids questioned why there was stars coming out of the world… funny! No good answer for that one, but they did look amazing all lite up! This would be a great Earth Day craft. My kids are enjoying playing this their new lights.


Your stuff is inspiring! I have a daughter and two sons and I look at everything and WANT to do more arts and crafts with mine… Thanks for so many ideas and adorable pictures… Are you on Pinterest? Or Facebook? Add me! Anyway to see your ideas lol.
These will work well as night lights for the kids – thanks for another great idea!
I remember doing something like this back in elementary school (when dinosaurs roamed the earth, circa 1965), except we used burned out light bulbs instead of balloons. We covered the bulbs all over with paper mache, dried and painted. When everything was dry and hardened, our teacher gently tapped each light bulb against the edge of her desk to break the glass. Instant maracas!
The lights could more so represent where big cities are rather than stars! 🙂
We, or in the other words, all the people are the stars!! I instantly thought of Amelia Bedelia!!
Pingback: The ABCs of Raising a World Citizen: P - T | All Done Monkey
Pingback: The ABC's of Crafting on a Budget - Letters P-T - Housing a ForestHousing a Forest
I love this idea. So creative! I would like to invite you to link up this post on my Money Saving Monday Link Up.
Just tell them the “stars” are cities! 🙂
I love that idea. Cities it is:)
Pingback: Cool Earth Day Craft: Paper Mache Globes « Canadian Family
Those are just plain awesome! This is definitely something I’ll look forward to trying with my girls when they are a bit older. This week’s theme for the Discover and Explore linky is Earth Day. I’d love for you to come share this idea if you are interested.
http://www.fantasticfunandlearning.com/earth-day-song-discover-and-explore.html
Thanks Shaunna:)
These globes would have been cool all by themselves, but then with the light coming through it makes it that much more awesome. Nice project!
The kids love them and they do look great all lit up:)
Pingback: Earth day discovery bottles | Teach Preschool
I love this idea! I did it with my Grade 6class for Earth Day this year and they loved it. They can’t wait to turn out all of the lights on Monday and turn on their globes. Thanks so so much for inspiring me!
I love it Alison! I would love for you to share a picture on the Housing A Forest Facebook page. How fun!
Pingback: Earth Day is Tomorrow! Celebrate With These Fun Crafts. |
Pingback: 20 Earth Day Crafts and Activities for Kids - Housing a ForestHousing a Forest
Pingback: 27 of the Best Blogs Figuring Out Ways to Celebrate Earth Week | Aupair Jobs
Pingback: Painting with Balloons - Housing a ForestHousing a Forest
Love these globes! I was looking for an idea of how to put continents on the globes the children will paint on Sunday and saw your lit up globes. Perfect!
We are doing world missions theme for SS this summer and because of vacations I need a one week project. So I will make the globes beforehand using rigid wrap (although I love clean newsprint and liquid starch) and the children will paint their globes with dabs of green and blue – I guess. The tea light in each globe will make them magical.
Thanks so much!!
I love these, and your step by step explanation with pictures is very clear and easy to follow. I’m thinking these would make for cool centerpieces for my school’s annual banquet that I (as the art teacher) am in charge of the art show and centerpieces part of the dinner. So happy I found you through Pinterest- thanks for the inspiration! 🙂
Beautiful craft! I will use for earth day at my home daycare. Wondering why you would use disposable (vinyl?! Plastic?!) tablecloth that will sit in landfill for next thousand years, especially on ‘earth day’. Otherwise i love this idea.
Thanks so much for stopping by Leanne. We actually didn’t use anything on the tables. I was just mentioning if you were worried about the mess, then that would make clean-up easy. Sorry I should have been more clear.
I love this! I know your students had a blast with this! So awesome that you shared this experience with them! I am featuring this on my blog, today!
I love the idea, and I plan to do this with my kids. I may even try it for Xmas decorations. I just cringed, tho, when I read the part about using disposable tablecloth, to throw out afterwards, and seeing disposable cups and plates in the photos. I plan to limit my waste to just the balloons — unless I can figure out a way to use something that’s reusable.
Doing this activity with my 6yr old this week, to celebrate the upcoming Earth Day! Thank you so much this is the first earth day project I showed her that made her eyes light up! We’ve done sooo much art, takes a lot to impress this one!