


Remembrance Day Crafts
In honor of Remembrance Day, my girls made these adorable poppies. I grew up in Canada where we recited the poem “In Flanders Fields” in school every November 11th. Every time I see poppies, I am reminded of all those that fought to keep us safe.
Cut and Paste Poppy Field

Annika made these adorable poppies. She started by drawing simple circles onto red paper and cutting them out. Each layer was glued onto the blue background. Quick, simple and adorable. I love projects that make a statement, yet are easy to make.
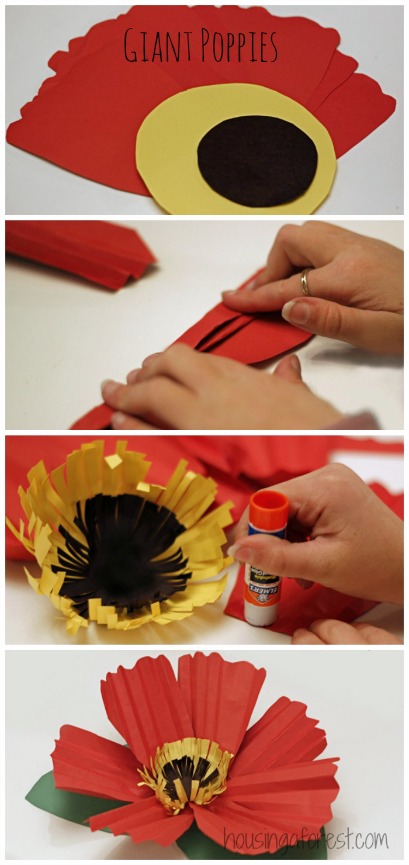
Giant Three-Dimensional Poppy Flower

The poppy Bree chose to make was slightly more involved. These three-dimensional poppies are based off this tutorial from The House That Lars Built. I love how adorable these little poppies turned out.

To make your giant Poppie:
- Red, yellow, green and black construction paper.
- Scissors
- Glue stick
First your will cut out a circle from yellow paper and a smaller black circle (these circles will serve as the poppies stamen).
You will also need to cut out 7 red poppy petals. Bree made up her own pattern, but it was basic petal shape. The top of the petal was slightly wavy to mimic a real poppy.
You will also need 2 over sized leaves cut out of green paper. They will become the base for your poppy.

Fold each of the petals like you would make a paper fan. No need to be too careful since you are just creating texture in your petals.

Cut a short slit into the base of each of the petals. You will glue the overlapped sides together to create a slight cupping to each of the petals.

To created the stamen, cut short slits all the way around the yellow and black circles. Bree struggled with this part, so I helped with this step. Gently curl the edges of each of the circles to create depth. Glue the black circle into the center of the yellow one.
Now your all ready to start building your paper poppy. Glue the leaves together to create the base of the flower. Each of the petals will be glued onto the leaf base. Over lap the petals slightly, but no need to be too exact since all flowers are unique. Finally glue the stamen into the center of the petals and your poppy is finished!
I love how they turned out! It would be so easy to switch out the color of paper used to create just about any flower. These would look sweet as a center piece for your next garden party, girly birthday party, or just about anytime you need an extra pop of color.

Bree has a special friend that had surgery over the weekend. Bree is excited to bring the flower to school to brighten her friends day. I love that she wrote a little note on the leaf. How special that her fun poppy turned into a special 3-D card to brighten a friends day! A giant 3-D flower card would totally brighten my day!
How are you going to use your three-dimensional flowers?


Those are super cute!!
Pingback: 25+ Flower Crafts for Kids - Housing a ForestHousing a Forest
My great grandkids are a little too young for many of your projects, but I think I may try the wax paper crinkle watercolour picture. I’ll try it myself first then see how the three year old might handle everything, except the hot iron.
I loved reading about your memories of Remembrance Day readings. I came to the US schools and felt I was betraying my Canadian roots when we said the Pledge of Allegiance. I got over it, but I’ll never forget how awkward it felt at first…I was born in the US but parents remained in Canada until I was in fourth grade. Both my parents were Naturalized US citizens.
For myself, I’m in the process of making a multi-national wreath. It will recognize my US birth, my Canadian parents and my Scottish grandparents. I purchased little cocktail flags for each country. ; ) I’m at a standstill right now because I couldn’t buy more flags to finish the project.