


DIY Crown ~ Easy Kids craft using feathers, nail polish and washi tape
My kids love feathers and creating simple crowns, so why not combine the two?!? Today, Lauren is going to show us a simple way to make a beautiful crown that your kids will love. They are so whimsical and adorable, honestly I want to make one right now!
Hi I’m Lauren from Me&MyGirl. My blog is about me and my inspirations, one of them being my 5 year old daughter Ava.
I’m a trained graphic designer and now work as an Account Director in a graphic design studio in Melbourne, Australia. I love photography, design, illustration, patterns, creative workshops and urban art.
From a young age, Ava showed a real affinity for creating. We spend a lot of time drawing, colouring, and making all sorts of fun stuff.
Today I’d like to share one of the easiest (and often prettiest) craft activities that we love to do: making crowns and feathered headbands.
You could use any of the following:
- Coloured craft feathers
- Coloured cardboard
- Craft scissors (to create patterns like zig-zag, scalloping etc)
- Sequins
- Glitter
- Fake flowers
- Patterned washi tape
- Coloured dots, and other decorative stickers.

Most of these items are fairly inexpensive and can be found in local supermarkets and bargain stores. Take a look at our post ‘The Craft Box’ for ideas about building up your craft supplies.
So here’s my how to for our crowns and headbands:
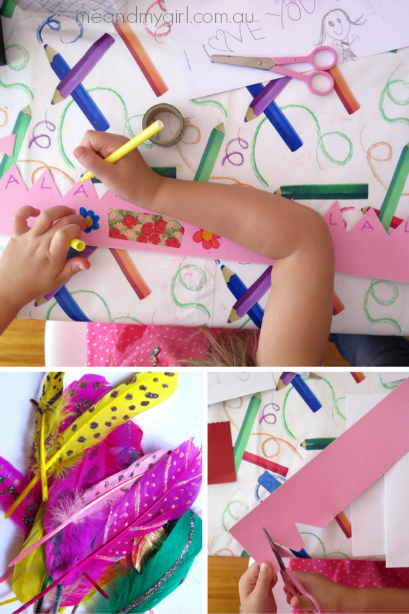
Step 1: Cut a long strip of coloured cardboard, about 8cm in height, and long enough to fit around your child’s head. I recommend using patterned craft scissors, which will create a nice feature on the top edge.
Step 2: Measure the strip around your child’s head and cut the length to size (remember to allow for an overlap so you can tape it together once finished). TIP: Don’t tape it together until finished, as it is much easier to decorate when flat.
Step 3: This is the creative part, and you can pretty much do what you like.
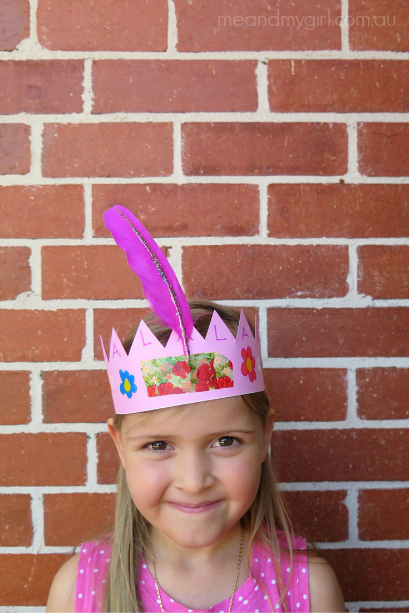
For the crown, Ava drew some shapes and wrote letters on the pointed tips (A for Ava and L for Lauren, so cute!). She stuck down strips of washi tape and added some cute stickers. Her final touch was a single glittery feather, also stuck down with washi.
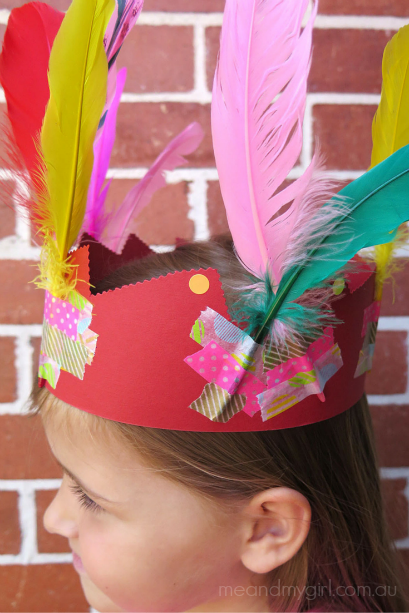
For the Pocahontas-style headband, we stuck colourful feathers down using a few different washi tapes, which added a pop of colour to the overall look. We also used dot stickers on the pointed tips.
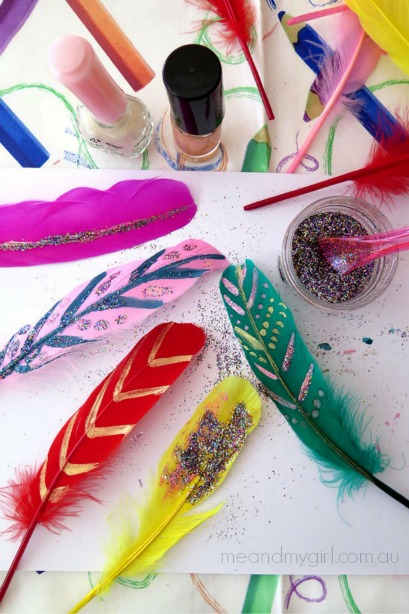
The day before we made these, we painted some of the feathers with nail polish. While wet, we covered some in glitter too. These made for a more decorative and super pretty addition to the plain feathers.

Step 4: Once you’ve finished creating, wrap around your child’s head and either stick together with tape or staple it.
Step 5: Marvel at your masterpieces and swan around the house together!
If you love creating with your kids, you might like our ‘Paper Cupcake Flowers’ or our ‘Paper Chain Creations’. And here are some tips on how to build up a great stash of paper for all things crafting!
Thanks so much for reading and to Tammy for having us, it’s been a pleasure and we hope you enjoyed this.
Lauren & Ava xo
If you’d like to connect, you can also find us here:
Instagram l Facebook l Twitter
……………………………………………………………………………….
These little crowns are totally adorable Lauren, thanks so much for sharing! They really couldn’t be cuter, and I love that you used washi tape, nail polish and glitter. They really make the feathers special. Simply adorable!
We all love comments, so why not pop over and visit Me&MyGirl and tell her how much you enjoyed her post on Housing A Forest.


