Rubber Cement Resist

Watercolor Techniques for Kids ~ Rubber Cement Resist

Rubber cement is a traditionally used as a paper glue however, it is a really versatile art medium as well.  One of my favorite watercolor techniques is to use rubber cement to create a simple resist.  The process is really easy, and the paintings always turns out great.

Watercolor Techniques for Kids ~ Rubber Cement Resist

This post contains affiliate links for your convenience.

Materials Needed:

Watercolor Techniques for Kids ~ Rubber Cement Resist

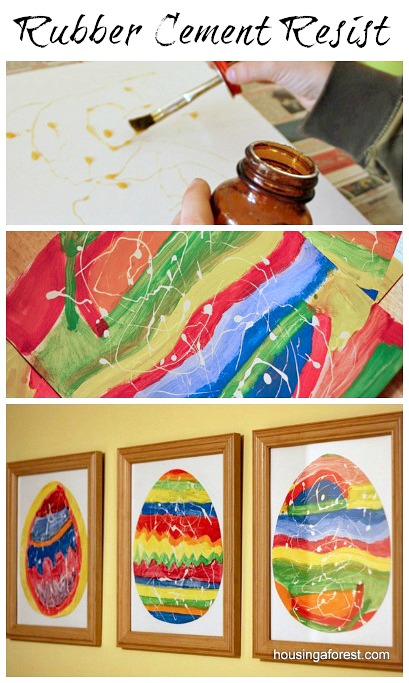
Start by dribbling Rubber Cement straight out of the bottle all over your thick paper.  We used poster board.  The kids found that moving their hands in a wiggly, back and forth motion worked best.

Watercolor Techniques for Kids ~ Rubber Cement Resist

Once the rubber cement is dry, paint over the entire paper.  You can use slightly thinned acrylics, tempera paint or liquid watercolors all with great results.  You will have to be careful if you are using watercolor cakes, the color tends to rub off in the next step.

Watercolor Techniques for Kids ~ Rubber Cement Resist

Gently rub over the rubber cement with your fingers.  This will remove any rubber cement residue from your paper.  You will be left with a beautifully painted paper with squiggly lines through it.

Watercolor Techniques for Kids ~ Rubber Cement Resist

We cut our paintings into Easter egg shapes.  I love how they turned out and they add a bright splash of spring color to Moms kitchen.

For more simple Watercolor Techniques, check out our:

Spring Oil Pastel and Watercolor Resist

Raised Salt Painting

Painting on Wet Glue

Georgia O’Keeffe Flowers

Melted Crayon Easter Eggs

Dying Easter Eggs

We recently enjoyed dying Easter eggs with our cousins.  This is one of my kids favorite Easter activities, and one of mine as well!  The kids love dunking the eggs in bright dyes and getting creative with crayons and rubber bands.  This year we tried making Melted Crayon Easter Eggs, and they turned out great!

Dying Easter Eggs ~ Melted Crayon Easter Eggs


One of the cousins got creative with rubber bands and made this little egg holder.  Kaleb loved it and used it to dip all his eggs.  The tail was prefect for keeping his fingers out of the dye.

Dying Easter Eggs

We had boiled and cooled the eggs earlier (for regular egg dying).  Ideally, you would sprinkle the crayon shavings on freshly boiled eggs.  However, it we ended up rewarming our cooked eggs in boiling water with no problems.

Sprinkle the crayon shavings onto the hot eggs.  The egg will melt the crayons and create a beautiful pattern.  Make sure you cover work surface or use a paper plate like we did.  It can get a little messy.

Melted Crayon Easter Eggs ~ a fun way to dye Easter EggsPlease use caution when working with hot eggs and melting wax!

I love how the melted crayon eggs turned out.  We also added some glitter for extra sparkle while the crayon was still warm.  You can never have enough sparkle at Easter:)

Melted Crayon Easter Eggs ~ a fun way to dye Easter Eggs

For more creative ways ideas on dying Easter Eggs, check out our:

Sharpie Tie Dye Easter Eggs

Volcano Easter Eggs

Kool-aid Easter Eggs

Naturally Dyed Easter Eggs

Poor Chocolate Easter Bunny!

The kids each received a special Easter bunny from their Great Grandma.  One of the kids commented that “this is my very first chocolate Easter bunny EVER!”  Yes you read right.  My kids are all school age and they have never had their own chocolate Easter bunny.  This is not really because I have anything against chocolate Easter bunnies, but more because I am a disorganized mom that does not remember to purchase them ahead of time.  The kids have Easter baskets each year, but the tradition of adding a chocolate bunny seems to have missed our house.

Apparently this little guy should have come with bold instructions reading…”Hi my name is Fluffy and I will melt if placed by a sunny window!”  Bummer!  Thankfully my sweet little girl had a good attitude and was OK with the bunnies new look.  I am so thankful to be blessed with flexible kiddos.

Oil Pastel Easter Egg

Annika is into drawing Easter eggs at the moment.  She seems to go in cycles of what she creates.  Right now since we are gearing up for Easter, her creative energy leans to Easter eggs.  She chose oil pastels for this simple project.  They are perfect since they are easy to use and come in a variety of bright colors.

I love this bright rainbow Easter egg.

I found this simple picture frame and added a few hooks to it.  It is now the perfect spot to hang our keys.  We change the picture out with seasonal kid artwork.  It makes me smile each time I reach for a set of keys.

Building with Egg Cartons

My sweet Brother-in-law brought me a HUGE armload of egg cartons a while ago.  Love it!  We will be using them to house our fresh eggs when we give them away.  However at the rate our chickens are laying we will never run out of cartons:)  We decided to try building with egg cartons, and the kids designed a fun fort.

Bree counted 83 egg cartons!  Time for a project.

There are so many fun things to do with egg cartons.  We often use them as our painting pallets and they are perfect for creating fun crafts.  However since this was the first time that we had such a large quantity of them we decided to build a big fort.

They even built a cute little window.

I love how much they love playing together.  There was lots of fun giggles as we were creating.  They had to cut a few of the cartons in half in order to keep everything stable.  I love watching them problem solve.

Our inspiration came from this amazing house and tank made out of egg cartons!  You should go check them out they are amazing!

I would love to hear how you like to up-cycle your egg cartons.