


Art Recipe ~ Raised Salt Painting
Ready for a simple art activity your kids will LOVE. Seriously this is one of our favorite go to activities. The kid love exploring and watching their art come to life. Read on to find our how easy it is.
 Watercolors are such a versatile medium and I LOVE them. This time we used the liquid watercolors which I think is a bit easier for this project, but the cake variety work as well. For salt painting you will need table salt, white glue, watercolors and thick paper (I used watercolor paper because it was what we had on hand, but I have used mat board and even cardboard works well).

Family Fun magazine is wonderful and has so many amazing ideas, including this one.

Have the kids squeeze a design that they like onto the board with white glue. Simple shapes, and designs seem to work the best for this project. Once their design is complete, shake table salt over the entire piece. Don’t be afraid to use a lot of salt, you want to make sure the salt covers all sides of the glue. Tap off the excess salt into a tray, to use again.

Now let the magic begin! Gently touch the tip of your wet paint brush to the salt. No matter how many times my kids do this they are amazed to watch the watercolor spread up the salt. Try not to “disturb” the glue by dragging your paint brush.

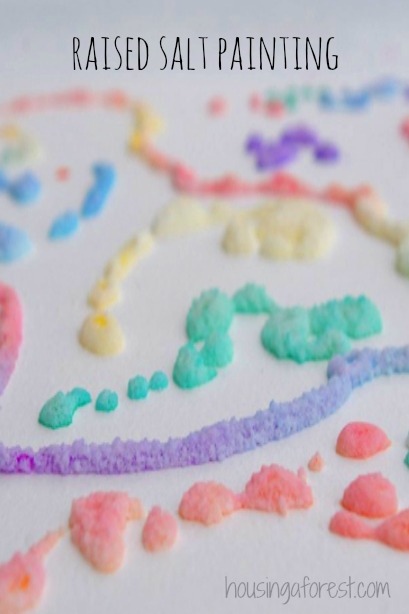
Once the glue is completely dry, your painting will sparkle beautifully. Unfortunately this project might not be well suited for the keepsake box since it does tend to flake off after a while, so take lots of cute pictures. Just remember art is often about the process and letting kids explore a new medium not always the end result.
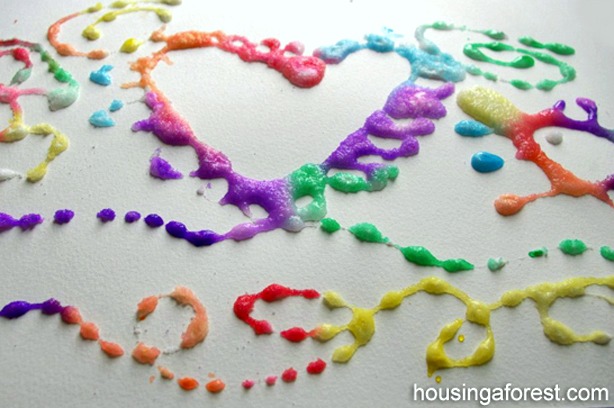
This one is still wet. Beautiful!

After the project dries over night, it should look similar to this. I love the results!


Love all the color and the intentness of the artists. What a fun indoor project.
neat, we will have to give that a try!
Gorgeous!!! I will try this in my Kindergarten class this year.
Pingback: I Spy Bottle & Salt Painting « Adventures of the Non-Creative Mom
I love this! Thanks for sharing. I run a daycare and love neat ideas such as this!!
Newest follower!
Can the painting be done on dried glue/salt? Maybe breaking up the project over a couple day/sessions?
I have not tried it on dried glue, but I would love to hear how it works for you.
Where can you purchase the liquid watercolors ?
I purchased mine at a craft store, but you can also just use water and food coloring. Both work great. Hope this helps.
Superb! what a magnificent tric!! thx for the tip!
Miep
Pingback: 101 MORE Ways to Embrace Summer | Family Your Way
Hi Tammy! I love this project and would like to demo it on our craft show at Cool2Craft.com. I’ve been looking for a technique for our Paint it Up episode and I’m so happy you shared this! I will credit you (and Family Fun Mag) and link back to your blog. Please let me know if there are any other links you’d like me to include and any info you’d want to add.
Candace
I would love it! Just a link back to the post on my blog would be great. I look forward to seeing it on your craft show, let me know when it is up. Thanks Tammy
Pingback: Rainy Day Activities for Kids » Mom-ology | Mom-ology
A very cool project! I have 2 questions: 1. When the project dries does the salt stay stuck and not fall off? 2. Could you tell me where you got the containers that the liquid watercolor is in? (in the first picture) I have been looking for these so I can use the liquid watercolor in my class but not have to constantly keep refilling little cups. Thanks!
Thanks! The salt did flake off a bit, but for the most part is stayed on the board. Make sure that you are using a sturdy surface like mat board. The containers that I have the watercolors in are actually washed out acrylic paint containers that came in one of those paint by number kits. I love them and they work great, but I’m not sure where you can find them. I totally agree that refilling little cups is a bit of a hassle.
You can buy very similar containers here: http://www.discountschoolsupply.com/Product/ProductDetail.aspx?product=22162&keyword=watercolor%20tray&scategoryid=0&CategorySearch=&Brand=&Price=
You can also use jello on glue…it does the same thing….and has pretty scents.
Great Idea! Thanks for sharing.
Loved these and the tin foil ideas. Great for the kids and have some I want to try for myself.
Wonderful ideas and super kid-friendly experiments that are sure to keep children everywhere excited and enjoy learning all at the same time. I taught preschool for a lot of years and keeping their attention and them enjoying learning (whether they know it or not…lol) is the key to success and your ideas are perfect for all the above. Keep the ideas coming so we can share the fun of science, awe and wonder again and again. (Makes us look like we amazing as teachers and parents too…lol)
Thank You, Lora Graham
Thanks! I would agree that having fun while learning is the best way to go(for kids and adults!). I love watching kiddos faces light up as they discover something new. Thanks for your encouragement:)
Pingback: Top Activities of 2011Housing a Forest
Pingback: The ABC's of Crafting on a Budget - Letters F-J - Housing A ForestHousing a Forest
I haven’t tried the salt and glue work yet but will do so …. when it is completely dry I am going to carefully cover it with a layer of watered down PVA (white glue). This always makes things really durable so hopefully it will work here too!
That is beautiful and my home educated children are expoloring water colours. We have a regular family art session at the weekend so that is the one for this time. Thank you for posting.
I love this! I am so looking forward to trying it out with the learners at our school. It will be such a wonderful learning experience and a great sensory tool when it is dry.
Thank you for sharing!
Hi Tammy, I have been looking for something to do with my different age group of kids . For a art show for a child abuse prevention . Would love to try this out for this. If its okay with you . I will also credit you and family fun mag. .Also I think I will try useing a paint sealer to see if that would help with the salt not falling off will let you know if it works. Thank you Grandma Linda
Pingback: Easy toddler crafts
I made this with my Pre-K class today and we had a blast. They turned out so pretty! 🙂 Great idea, thanks for sharing!
I love it! I bet they had a blast.
Thax for sharing this! this is supercool!
Where did you buy the white glue?
Can I get the informtion(where to buy, the brand name or so) for the glue and water colors?
We ( my 3 yo & I) did this project today. It was so much fun! She loved how the colors were absorbed, but she really liked pouring the salt. Lol the project turned out beautiful! It dried well and I’m going to glue the paper to a sturdier surface to keep it from cracking, then place in a frame. (We just used reg. construction paper because that’s what I had on hand. )
Thanks for the idea plus all the others on your site.
I actually love the way the paints appear more pastel when dried in the salt Thanks!!
great fun I am going to try this in kindergarden