Pumpkin Sensory Dough

Pumpkin Sensory Dough – Fall Sensory Play

We love Fall and had a blast with our recent Fall Recipes for Play Series.  I have been patiently waiting the arrival of pumpkins in our stores and they finally arrived!  I know sounds a little silly, but this idea has been brewing for a while and it needs a real pumpkin.  Since both Allison and myself have been playing the pumpkin waiting game together, we decided to join forces and share our pumpkin gut play recipes at the same time.  2 great ideas for the price of one!  You can’t beat that.  Allison of Learn Play Imagine made made a gooey Pumpkin Slime, and we created a squishy Pumpkin Sensory Dough.

Pumpkin Sensory Dough - Fall Sensory Play

Ever wondered what to do with Pumpkin Guts?

Well look no further, here are 2 fun sensory play recipes that your kids will love!

Pumpkin Sensory Dough - Fall Sensory Play

Carving pumpkins is on of my favorite Fall family traditions.  There is something satisfying and wonderful about exploring the inside of a pumpkin.  We love roasted pumpkin seeds and eating pumpkin pie, but had yet to find a “recipe” that incorporates the pumpkin guts.  Why not use them to create a fun Fall Sensory Dough.

Pumpkin Sensory Dough - Fall Sensory Play

I totally love that this simple play recipe is mixed right in the pumpkin, meaning there is no need to dirty a bowl.  If you have ever been in my kitchen (minus my edited and cropped blog photos) you may wonder if I chose to mix it in the pumpkin purely because all my bowls were dirty.  Ha!  My lips are sealed, plus my kids thought it was a genius idea.  Shhhh…don’t spill the beans, my kids still think that I am totally brilliant and can do anything.  

Pumpkin Sensory Dough - Fall Sensory Play

Our Pumpkin Sensory Dough Recipe is a mix between play dough and cloud dough.  It is firmer than play dough, and has a moldable texture similar to cloud dough.  I really had no idea which was the more accurate description, so instead of loosing sleep over the title, I settled on sensory dough.

Pumpkin Sensory Dough - Fall Sensory Play

Kids love playing with regular kitchen utensils.  I love how they immediately pick up a tool and begin exploring.  They don’t stress if they are using it in the right way, they just dive right in and discover as they go. Love that!  I mean really, why wouldn’t tongs work better above your head?

Pumpkin Sensory Dough - Fall Sensory Play

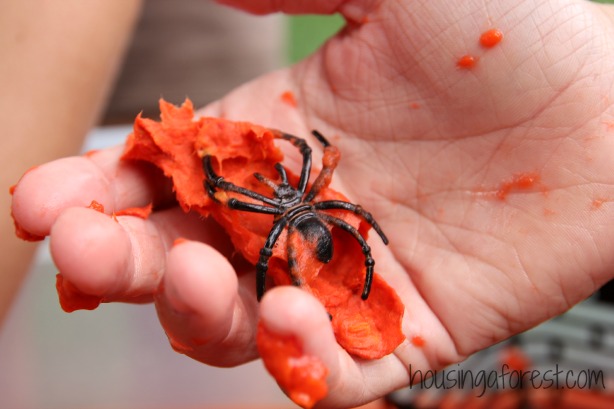
 Even though the pumpkin guts (minus the seeds) took a little whirl in the blender, you can still see the wonderful texture that it adds to the dough.

Pumpkin Sensory Dough - Fall Sensory Play

The kids had a blast sprinkling corn starch around the play surface and the pumpkin.  I am sure they added way more than necessary to keep the dough from sticking, but they were having so much fun and totally focused on “their job”.

Pumpkin Sensory Dough - Fall Sensory Play

 Pumpkin Sensory Dough Recipe:

  • 2  cups of pureed pumpkin guts ~ we placed the guts (minus the seeds) into the blender and pureed until it was smooth.  Since pumpkin guts are naturally wet, there was no need to add water.
  • 2 to 3 cups of corn starch ~ You may need more depending on how wet your pumpkin guts are.
  • 1/2 cup of baking soda
  • 1 TBS of dish soap ~ any soap may work, but we used dawn dish soap.
  • Spices (optional) ~ however they do smell great.
  • Pumpkin seeds to add back into the dough

Pumpkin Sensory Dough - Fall Sensory Play

Puree the pumpkin guts (minus the seeds) until smooth and pour back into the cleaned out pumpkin.  Have your kiddos dump the 1st cup of corn starch directly onto the pureed pumpkin and mix.  You can mix with a spoon or your hands.  Both work great.  Next, add in the Baking soda and mix again.  Finally add in the dish soap and the rest of the corn starch.  Depending on how wet the pumpkin gut puree is,  you may need to add more corn starch.  Just keep adding until you have a moldable dough.

Pumpkin Sensory Dough - Fall Sensory Play
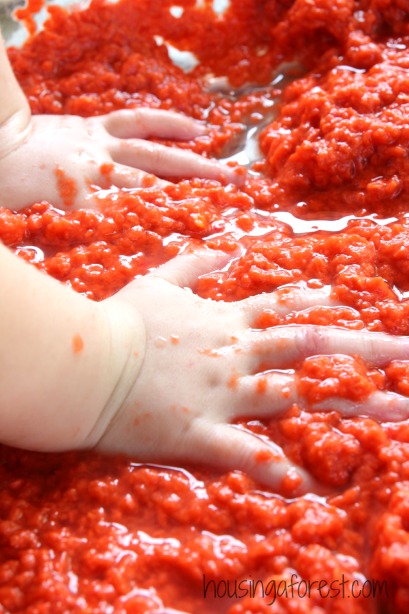
Ready for another amazing Pumpkin Gut Play Recipe?  Check out this super gooey and oh so fun sensory experience.

Pumpkin Slime ~ Fall Play Recipe

Learn Play Imagine is all about sensory play, and their gooey Pumpkin Slime looks totally amazing!

Pumpkin Sensory Dough - Fall Sensory Play

For more Fall Pumpkin Inspiration, check out our…

Yarn Pumpkins

Kool-aid Pumpkins

36 Creative No Carve Pumpkin Ideas

5 Minute Paper Plate Pumpkin

Painting on Wet Glue

Sun-Catchers ~ painting on wet glue

Painting On Wet Glue ~ beautiful sun catcher

Paint and Play Challenge ~ Painting with Glue

We are back with another Paint and Play challenge with  Crystal from Growing a Jeweled Rose and Vicky from Mess for Less.  If this is your first time joining us,  the focus for our series is all about the process and encouraging our kids to get excited about creating art with fun and unique mediums!  Our challenge this week was to create art with Glue.  We wanted to make a set of sun catchers to brighten our widow, so we tried our hand at Painting on Wet Glue.

Painting On Wet Glue ~ beautiful sun catcher

I recently found these amazing Cosmic Sun-Catchers and I knew we had to try creating our own.  Secretly I really wanted to paint on glue myself, but shhhh don’t tell my kids:)  Plus this little art project involves the use of recycled materials and it only takes a few moments from start to finish (except for drying time).

Painting On Wet Glue ~ beautiful sun catcher

Since Babble Babble Do posted such an amazing tutorial, I am only just going to post the pictures of our process.  Make sure to hop on over to their blog to find the full instructions.

Painting On Wet Glue ~ beautiful sun catcher

The kids loves squishing the food coloring onto the set glue.  Such a simple exercise, but  wonderful for working those fine motor muscles.

Painting On Wet Glue ~ beautiful sun catcher

I think everyone’s favorite part including mine, was swirling the food coloring drops around in the white glue.  It was so fun to see the patterns emerge and watch the colors mix.

Painting On Wet Glue ~ beautiful sun catcher

I love how easy this activity was to set up.  We always have white glue and food coloring on hand, so no need to make a special trip to the store!  We will be revisiting this activity again soon!

Painting On Wet Glue ~ beautiful sun catcher

I was so excited to share these with you so they are still wet.  If you are wondering what our glue painting looks like hanging in a window with the sun streaming through, then hop over and check out these beautiful Cosmic Sun-Catchers.

Painting On Wet Glue ~ beautiful sun catcher

 I love finding new ways to paint, and this activity was oh so satisfying!

 …………………………………………………………………………………………

FOr more creative way to Paint and Play with Glue, make sure to check out…

Magic Glue Paints

Magic Glue Paints from Growing a Jeweled Rose

Black Glue and Watercolor Pumpkins

Black Glue and Watercolor Pumpkins from Mess For Less

Don’t miss out on any of our Paint and Play series.

Painting On Wet Glue ~ beautiful sun catcher

If you love process art like us, then check out my Painting Without Brushes Pinterest board.  It is packed full of fun ideas.

Oven Dried Fruit Leather

 Oven Dried Fruit Leather ~ No Dehydrator Needed!Oven Dried Fruit Leather ~ No Dehydrator Needed!

My kids love store bought fruit roll-ups, but I have a hard time spending money on the sweet treats.  Especially since in just a few simple steps I can make a healthy homemade version that my kids love.  My favorite part about making our own fruit roll ups is that I know exactly what they are made from.  If you own a dehydrator, you’ll love our Strawberry Kiwi Fruit Leather.  However this time we decided to try our hand at making Oven Dried Fruit Leather.  Both versions have the same delicious taste and contain 100% real fruit.    Oven Dried Fruit Leather ~ No Dehydrator Needed!

How to Make Oven Dried Fruit Leather:

Start with ripe Fresh Fruit ~ use any of your favorite fruit combinations. If you enjoy it in a smoothie, chances are you will love it as a fruit leather as well.

My kids like their fruit leather slightly tart, so we choose not to add sugar.  However, if you like a sweeter version, then go ahead and add sugar to taste.

Oven Dried Fruit Leather ~ No Dehydrator Needed!

 Strawberry Banana Fruit Leather

Ingredients

  • 1 lb of ripe sweet strawberries
  • 3 ripe Bananas
  • Sugar to taste (if you like it sweet)

Instructions

  1. Preheat oven to 170 degrees. Line a baking sheet with either a silicone baking mat or parchment paper.
  2. Place bananas and strawberries into a blender or food processor, and blend until you create a smooth puree.
  3. Pour the fruit puree into the lined baking pan and smooth with a spatula to about a 1/4″ thickness.
  4. Bake in the oven for about 6-8 hours. Time will vary depending on the thickness.
  5. The fruit leather will be slightly tacky when done, but not sticky or wet at all.
  6. Transfer to a cutting board, to cut into desired strips. Wrap in wax or parchment paper and store in an airtight container.

Oven Dried Fruit Leather ~ No Dehydrator Needed!To store, place in a airtight glass container and keep it in the pantry. But let me warn you…they are addicting and may disappear all in one day!

Oven Dried Fruit Leather ~ No Dehydrator Needed!Strawberry Fruit Leather

Ingredients

  • 1 lb of ripe sweet strawberries
  • Sugar to taste, if desired

Follow the direction above for pureeing, drying and storing!

Do you have a preferred way of making Fruit Leather?  I would love to hear your favorite fruit combo.

Happy Snacking!

Halloween Sensory Play

A perfect sensory activity for Halloween.

Halloween Sensory Play ~ Gooey Spider Halloween Fun

Halloween is right around the corner and we are having a blast playing with our goop filled Halloween sensory bin. It’s wet, squishy, gooey and with the addition of a few spiders, it makes a perfect Halloween sensory play activity.  We had so much fun creating our Fall Centerpiece that we had to find another fun use for our squishy pulp!  I am so glad we did.

Halloween Sensory Play ~ Gooey Spider Halloween Fun

The kids loved scooping the goop with Halloween baskets and mini pumpkin buckets.

Halloween Sensory Play ~ Gooey Spider Halloween Fun

 As you can see, the texture of the pulp was so intriguing to the kids.  They dove right in up to their elbows with out hesitating.

Halloween Sensory Play ~ Gooey Spider Halloween Fun

 Kitchen strainers work great for scooping and draining the water.

Halloween Sensory Play ~ Gooey Spider Halloween Fun

 The kids had so much fun just simply transferring the wet mixture into buckets and then pouring it out.  I love letting the kids discover and play through fun sensory activities.  You might be surprised to learn that when I first had kids, I banded play-dough from our house.  Gasp!  Yep you read right.  I am so thankful that I let go as a parent and now embrace the joys of messy play.

Halloween Sensory Play ~ Gooey Spider Halloween Fun

The kids loved watching the pulp cling to the basket as the water dripped off.

Halloween Sensory Play ~ Gooey Spider Halloween Fun

The kids discovered that if they squished all the water out of the pulp, they could create an intriguing spider egg sack.  Super cool.  According to my daughter, Spiders rock.  Ha!  I may not have her love of spiders but I do love this simple spider web that we created.

Halloween Sensory Play ~ Gooey Spider Halloween Fun

Halloween Pulp Sensory Bin:

  • Scraps of orange paper ~ we used construction paper and off cuts of scrapbooking paper.  We raided our scrap paper bin of all the orange paper we could find.
  • Hot Water
  • Blender

Since essentially the bin is filled with wet paper, it is non toxic and totally safe for kiddos (All our paper was ink free).

Halloween Sensory Play ~ Gooey Spider Halloween Fun

Start by shredding your paper.  We cheated and used the paper shredder, but you could rip or cut your paper into tiny bits.  My kids love any chance they get to use the paper shredder, so this was the perfect excuse.

Once all the paper is cut into tiny pieces, place it in a heat safe container and pour boiling water over it.  You will only need to add just enough to cover the paper (please be careful with this step).  The hot water helps to break down the fibers in the paper making the next step easier.  Let this mixture sit for at least a few hours (ours was left over night).

Now you are ready to start blending the paper into a pulp.  We just used our regular kitchen blender and washed it out really well after we were done.  It is easiest to blend in small batches.  You may need to add more water to the blender.

Halloween Sensory Play ~ Gooey Spider Halloween Fun

Tips:

  • Once you created your pulp, you can place it into the fridge for a surprisingly cool sensory experience.
  • Add plastic baskets, cups and strainers to sift and pour with.
  • This mixture can last up to a week if stored in the fridge.
  • Since the mixture is just paper and water the clean-up is a breeze.

Halloween Sensory Play ~ Gooey Spider Halloween Fun

Had we no where to be, the kids would have played and squished in this simple mixture all day.  I love how easy it was to make, and the best part is…it was free!  I love finding new uses for our paper scraps!

We love creating seasonal activities.  Check our our latest fall and Halloween posts for more inspiration.

Painting With Monster Hands

DIY Paint brushes ~ Halloween painting

Painting with Monster Hands ~ Halloween Painting activity

I am so excited to have Vicky from Mess for Less joining the Paint and Play series that we have been doing with Crystal from Growing a Jeweled Rose.  If this is your first time joining us,  the focus for our series is all about the process and encouraging our kids to get excited about creating art with fun and unique mediums!  Our challenge this week was to create our own DIY Paint Brushes.  We were inspired to create a little Halloween art and the kids had a blast getting messy and Painting With Monster Hands.

Painting with Monster Hands ~ Halloween Painting activity

My kids found a few of these plastic Halloween Finger puppets in the bottom of their Trick or Treat bags last year.  When I was pulling out the fall decoration I discovered them tucked in among all the pumpkins.  Fun candy alternatives are always welcome in our house.  Last year we made creative Candy Wrapper Turkeys and played with 3 sticky ways to Paint with Candy.

Painting with Monster Hands ~ Halloween Painting activity

Painting With Monster Hands

This simple process painting activity is so easy to set up.  All you will need is a few plastic finger puppets and some paint.  Yep that is it, nothing fancy here.  However, let me tell you, the kids had a blast dragging paint with their plastic monsters!

Painting with Monster Hands ~ Halloween Painting activity

The Mummies paint covered hands and head make me smile.Painting with Monster Hands ~ Halloween Painting activity

I simply set a tray of paint on the table, along with a few plastic Halloween Finger Puppets and invited the kiddos to paint.  I gave no special instructions, but none were needed.  They jumped right in creating beautiful Halloween art!

Painting with Monster Hands ~ Halloween Painting activity

I’m sure the person that was handing out these adorable finger puppet for Halloween never dreamed of them becoming little paintbrushes.  However, even though they were not designed for paint they worked great.

Painting with Monster Hands ~ Halloween Painting activity

Sometimes the simplest activities are the ones that kids like the most.  There have been so many times where I have put countless hours into creating the perfect project, only to have the kids play with it for a few short moments.  Boo!  That’s why I love this project so much.  My kids painted with these little monsters for a long time.  When I told them it was time to move on, they were sad, and I am sure could have painted all day.  This is something that we will be revisiting again for sure!

Painting with Monster Hands ~ Halloween Painting activity

I love all the paint covered Monsters lined up, waiting for their next dip in the paint.

Painting with Monster Hands ~ Halloween Painting activity

Eventually the kids were painting with all 5 fingers encased in a finger puppet and loving it!Painting with Monster Hands ~ Halloween Painting activity


Once the kids were ready to be done painting, I set up a simple Monster Washing station.  Great way to extend the activity a little and get the painty monsters clean again.  Love!

 …………………………………………………………………………………………

Painting with Rubberband Paintbrushes

How fun are these squiggly, wiggly Rubber Band Paintbrushes.

Homemade Paintbrushes

Use things from around your home to create this fun series of Homemade Paint Brushes.

Don’t miss out on any of our Paint and Play series.

If you love process art like us, then check out my Painting Without Brushes Pinterest board.  It is packed full of fun ideas.

Painting with Monster Hands ~ Halloween Painting activity