Color Wheel Ceiling

Amazing DIY Birthday party Decorations ~ Color Wheel Ceiling

Every Art Party needs a color wheel.  So when I was thinking of decorations for Annika’s party I new I wanted to have a color wheel somewhere.  Then I came across this wonderful streamer installation over at O Chickadee.  It looks amazing!  I decided that was exactly what our ceiling needed.

Color Wheel Ceiling ~ Amazing Birthday party Decorations

This post contains affiliate links for your convenience.

Color Wheel Ceiling Materials:

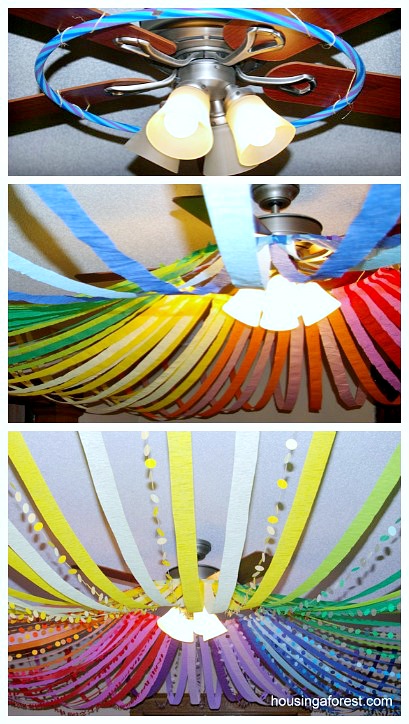
To start, we tied one of the kids hula hoops directly to the ceiling fan.  Then we screwed a screw directly into  the wall of each corner of the room.  We then strung twine between the screws, making sure that it was really tight.  We will be removing all the plaster in our living room in a few weeks so we were not worried about holes in the walls.  Which makes this so much easier!  Don’t worry, the hula hoop will be hidden!

Working in sections, we used the streamers to create the color wheel.  Each section is made up of two shades of each color.  I was thankful that I had a number of streamers in our basement from previous parties.  We ended up only needing to buying a few new streamer colors. We varied the height of each streamer slightly, which added interest and depth.  Plus it was way easier than trying to match everything up!

You could stop here, honestly the streamers looked pretty good.  Although, the addition of the circle dot streamers turned it into something spectacular!

I used a small Circle Punch and the scraps from my scrap booking paper.  It took a few hours to punch all the circles.  I simply popped in a could girly movies and went to work punching out circles.  I used as many varying shades of paper that I could find in my crazy large stash of scraps:)

With a budding seamstress in our house, I only did a small portion of the sewing.  Bree thought it was great fun and before I knew it she had sewn all the dots together!  Love it!  I know that not all 6 year olds are ready to use a sewing machine, but Bree loves it.  She has great patience, and I am sure she will be passing my skills soon.  This might be a good excuse to make a trip to Canada to visit Grandma!

Color Wheel Ceiling

We strung the dots a bit lower than the streamers because I love them so much.  I didn’t want them hidden in the streamers.  I think that it looks amazing.  How am I going to convince my family that we don’t need the fan this summer, just a pretty ceiling?  I can see this same technique translated for so many parties.  The possibilities are endless.


There has been some talk about sleeping under the streamer canopy,  maybe over the weekend.  My kids love sleeping in fun new places, like forts, closets and under Christmas trees.  Sleeping under the decorations could be a new fun tradition to add to the list of birthday fun.

For more Birthday Party Inspiration, check out our:

Art Birthday Party

Kickball Birthday Party

Gingerbread Birthday Party

Wii Birthday Party

Monster Cake Pops

Pour Painting

I am in love will the You Tube video of Holton Rower’s Tall Painting. It is so amazing and inspiring.  If you have not seen his video yet, you need to check it out!  Soon after we watched the video(for the 15th time!), Pepper Paints posted an art lesson she did.  This is something that I am going to try with my kiddos over the summer.

Tall Painting by Holton Rower

The tall paintings were our inspiration to create a focal painting for Annika’s Art Party.  We used cheap craft paint, but I am on the hunt for bright house paint which would make this an even more affordable project.  There are places that you can drop off unwanted paint, I wounder if they would let me pick it up as well?  Hmmmm…something to check into.

Pour Painting

Make sure to cover your painting surface with thick plastic table cloth, since you will be encouraging paint to drip off the edge of the matting board.  Cover the board with a quick layer of paint.  Painting the surface before you start pouring is important.  It encourages the paint to spread over the entire mat board vs making trails of paint.  While the paint is still wet start pouring paint directly out of the container onto the board.

Pour Painting

Once you are happy with how it looks, tip the board in all directions allowing the paint to run together.  Some paint will run off the edges and that is OK.  Just simply just tip the board in a new direction.

Pour Painting

Lay the board back down and pour on more paint, tipping the board again.  Repeat this process until the entire surface is covered.  Annika repeated this process about 10 -15 times.  She loved watching all the colors mingle and create fun designs.

Pour Painting

I think that Annika might have chosen the paint colors to match her shirt.  Too funny!  Nothing like sweet concentration to create a master piece!

Pour Painting

The painting only took over night to dry which I was amazed at.  I thought that since the paint was in thick layers it would take a lot longer.  I love how it turned out!  We will need to try this again with the rest of the kiddos.

Art Party Invitations

Our house is buzzing!  Our youngest is turning 5 soon, and I am super excited.  Annika is so full of life, caring and often has our house in hysterical giggles.  She has a love of everything art related and she is continually asking to do a “project”.  Love it!  So when we were thinking of what type of party she wanted it was an easy choice…Art Party.  As I am writing this, Annika is cuddled up beside me and pretending to paint Tangled on my cheek with a a dry brush.  Everything is a canvas and I love encouraging her to be creative.

I admit, I have a bit of a thing for birthdays.  There is something about my house all decorated, lots giggling kids and tons of cake that makes me really happy.  OK if I am being completely honest, I LOVE decorating the house and creating the party atmosphere.  I would love to hand over everything to someone more capable once the kids start arriving.  Not that I don’t enjoy the party as well, I just REALLY love staying up late crafting, decorating and transforming my home.  I am so glad that my kids love parties as much as I do, or at least they pretend to:)

Over the next few days I will be busy creating, painting and truly enjoying the turmoil that birthday parties bring to our house.  I can’t wait to show you how our house transforms.  (Transforms might be a bit of a strong word to use, but I can’t think of a better word so transforms it is!)  For now here is a peek at the invitations that I created.  They are really simple, but I love them.

Basement Swing

I stole a few precious moments this morning to curl up with a coffee and scroll through my Google Reader:)  It’s raining outside so the kids are happily building a fort in the basement.  I love listening to muffled giggles as they discuss who has the best fort design to use.  I also hear them talking about how to incorporated the swing into the design.  My husband installed some IKEA hand rings in their playroom.  The kids love them and are constantly creating new tricks.

They came up with this 3 person swing design the other day.  Kaleb is getting to be a master at knot tying, but I’m still not sure about this design!  So cute to see them problem solve though.  Sorry about the blurry photo, they were having so much fun I could not take a clear picture.  You can see the entrance to the fort just behind the kids.  Our basement has concrete walls, carpet tile flooring and really low ceilings.  Perfect for kids to play in and just be kids!  I recently picked up a large green wrestling mat that sits below the “swing”.  The kiddos spend hours down there playing and being creative.  I love having a space that is just theirs.

Anyways, back to my quiet moment reading.  I am inspired by all the creative projects you guys come up with.  I just wish there was more time to try all of them out!  A few blogs in, and I am confused as to why a picture of myself was staring back at me.  It takes me a bit to realize that my blog is being featured on Blue Cricket Design!  Seriously, how fun is that!  I love Becca’s blog, she has amazingly creative ideas, and I am honored that she would choose to feature my coffee sack art.  If you have not already paid Becca’s blog a visit you need to!

Tape Measure Age Predictor

Today I found my husband and the kids all huddled on the floor looking at a tape measure.  Wondering what they were up to, I joined the circle.  The kids quickly explained that Dad was teaching them a magic trick with the tape measure and that they could tell me how old I was.  OK I’m game!

Here is how the trick works.  Pull out the tape measure and fold in half so that the metal end of the tape measure is lined up to the current year.  Your tape measure should be doubled back on itself.  Since it is 2011, you need to line up the end of the tape with 111.

Next, find the year you were born.  The corresponding number on the opposite side of the tape measure is how old you will be on your birthday this year. For example if you were born in 1992 you will be 19 this year.

It is a bit confusing for the kids born in 2000 or later.  For example, Kaleb was born in 2002, so this year he will be 9.  The tape reads that it is 102, the only numbers that you will be using is the “02” not the 1.

I’m glad I stumbled upon this sweet teaching moment between Chuck and the kiddos.  It is something that I often take for granted, since Chuck is so good with the kids.  There is just something about a Dad on the floor playing and teaching kids that is really special.  Love it!  This trick was something that Chuck learned as a little boy, and he was excited to pass it on to our kids.  I’m sure all our unsuspecting friends will love sharing their age with our kids;)