


How to Distress Furniture ~ Wooden Chest
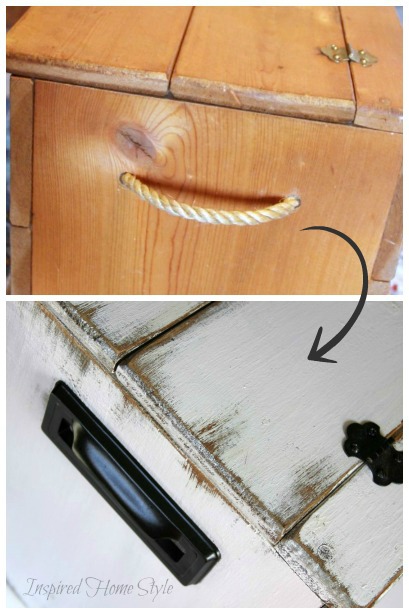
Here is a sneak peek at what I am creating over at Inspired Home Style. I love turning something discarded into something new. I found this little blanket chest on the side of the road with a free sign. Score! I even repurposed the handles for this project. Small projects like this one are perfect to learn how to distress furniture.
Hop on over to Inspired Home Style to see how we transformed this discarded Wooden Chest. Im sharing an easy technique for creating gorgeous, aged finishes on basically any wooden surface. To demonstrate, I turned a boring pine box into this rustic beauty
Make sure to also check out these favorite projects:


I love it! The finish looks great, and I love how you stacked them one on top of the other.
It’s beautiful! You did a great job on it!
What a great makeover! I love old crates and this one looks amazing stacked atop the other one. I do a lot of hidden storage in my home as well. Keeping handy things handy while keeping the clutter clear. Of course, when it looks this good it’s just a double bonus. I found you from A Diamond in the Stuff’s time to shine party and am now a new follower 🙂
That looks amazing!
Hope you’ll link up to my Link party! 🙂
Vintage Mauve Link Party
Cheers,
Jessica
You took this from ugly to absolutely gorgeous! I would love if you would share with my readers on Blog Stalking Thursday! http://thecraftyblogstalker.blogspot.com/2012/02/blog-stalking-thursday-30.html
I love the way this turned out and your stolen handles just MADE the project.
Im your newest follower, so please, please come visit me and maybe you’ll follow me too.
Looks great, those handles are perfect for the perfect price! Thanks for linking up.
A very nice piece. Great inspiration!
Turned out great!! I have one a similar toy box half painted in the basement. You’ve inspired me to finish it:)
I just picked on up too…Thanks for the ideas. Now I’m itching to get to work…going to run and get handles 🙂
How clever! Now I want to make one. Just need to find an alley and a box to go with it.