


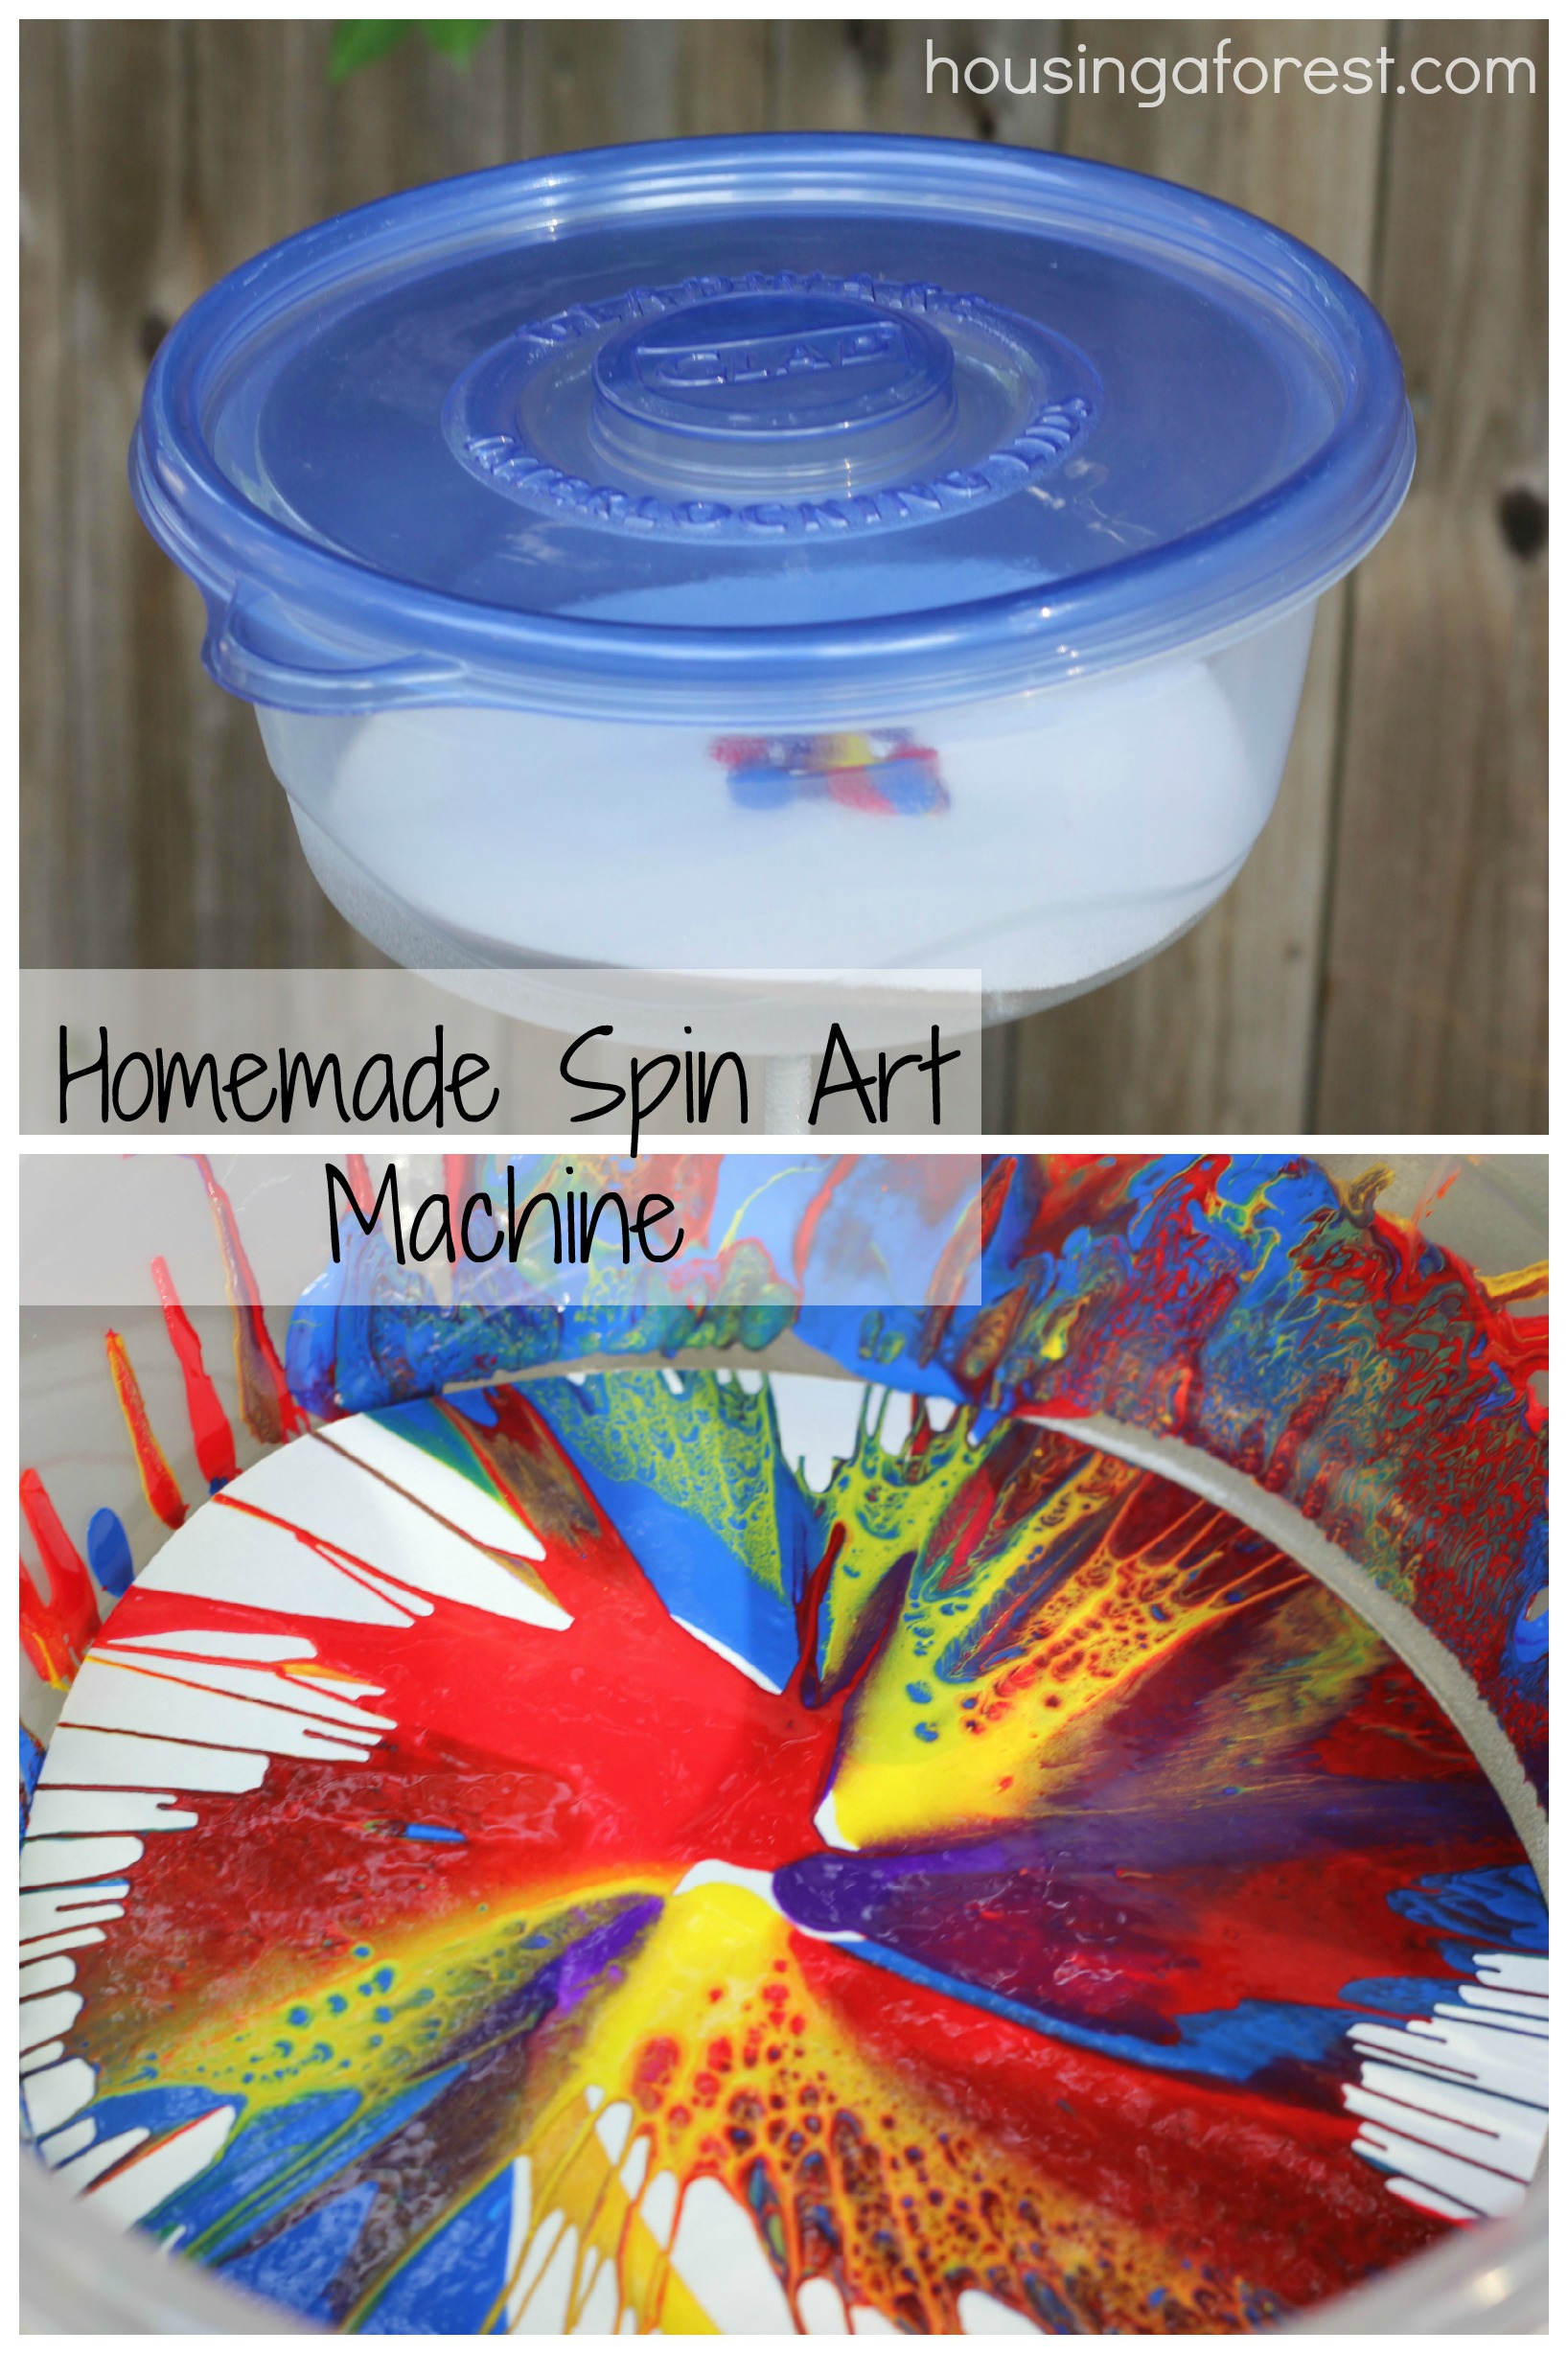
How to make your own Spin Art Machine
Have you ever tried creating Spin Art? We love our store bought spin art machine, however I often get emails wondering if we have an alternative to purchasing a Spin Art Machine. So we came up with 2 simple ways that you can make a Homemade Spin Art Machine from things around your house.
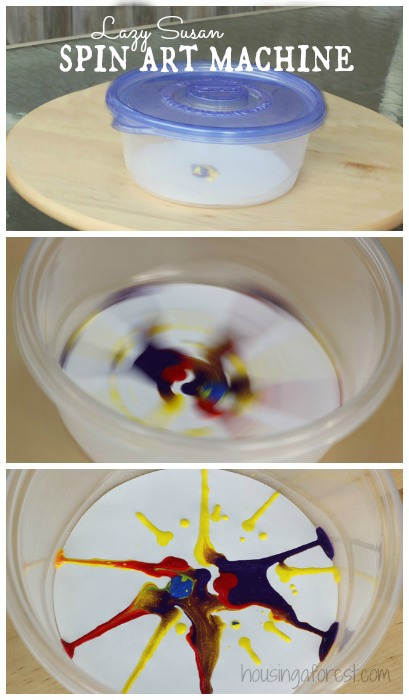
#1 ~ Lazy Susan Spin Art
We picked up a Lazy Susan years ago at a thrift store, and it has been sitting in the basement collecting dust. So we dusted it off and turned it into a simple Spin Art Machine.
Materials:
- Lazy Susan that spin easily
- Container ~ we used a disposable clear container so the kids could see their artwork. No need for a lid.
- Squeeze bottles of watered down paint ~ we used tempera paint
- Masking Tape
- Paper ~ cut to fit inside your container
Simply tape the container to the center of the Lazy Susan. Squeeze some watered down paint into the center of the container and spin the Lazy Susan.
Tips:
- You need to be able to spin the Lazy Susan fast in order to get the paint to splatter to the edges. My kids are 7,8 and 10 and it worked well for them, but younger kids would need help spinning it.
- We also found that it worked best with 2 people. One person did the spinning and another person added the paint while it was spinning. So easy and the kids loved the results.
- When we were all done, we simply removed the container and the tape and sent it back to the basement to collect some more dust:) I love that we didn’t have to permanently alter the Lazy Susan to make our art.
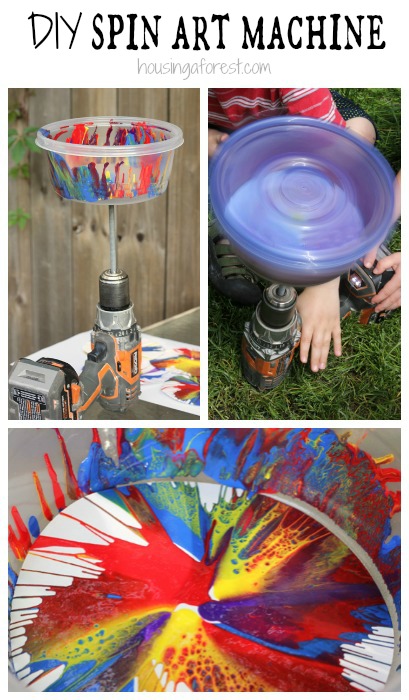
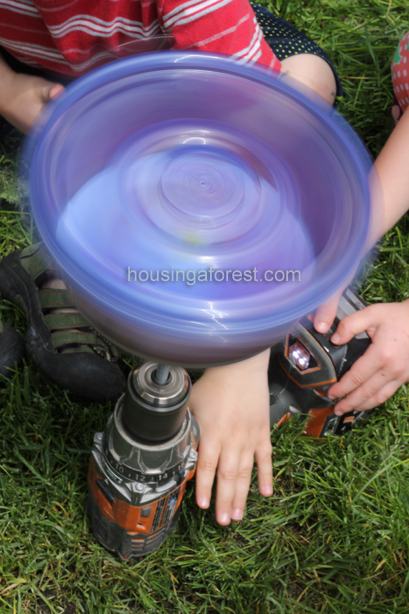
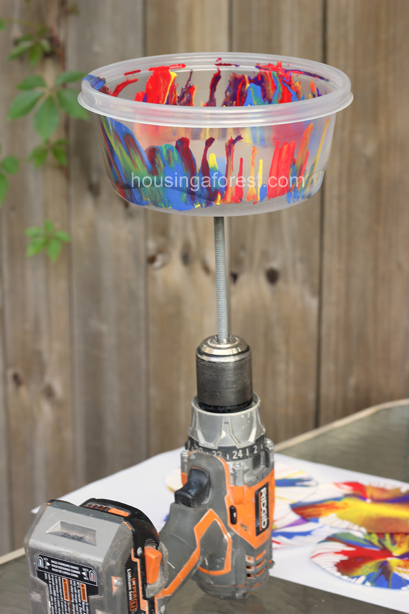
#2 ~ Electric Drill Spin Art
Now this one was AMAZING! When we were testing out the Lazy Susan idea, my son asked if he could try using an electric drill. Love it, although I was not sure exactly what he was thinking. Off to the garage Kaleb and Chuck went and came back with this amazing contraption. This is my sons version of a spin art machine, with a little tweaking from my hubby:) My 10 year old boy is in love with power tools, so this was right up his alley!
Please remember to be careful when using power tools with kids! My kids are old enough to know how to use a drill, but they are dangerous and need to be handled with care! PARENTAL supervision is required for this activity! After some reminders of safety precautions we set to work.
Materials needed:
- Electric Drill
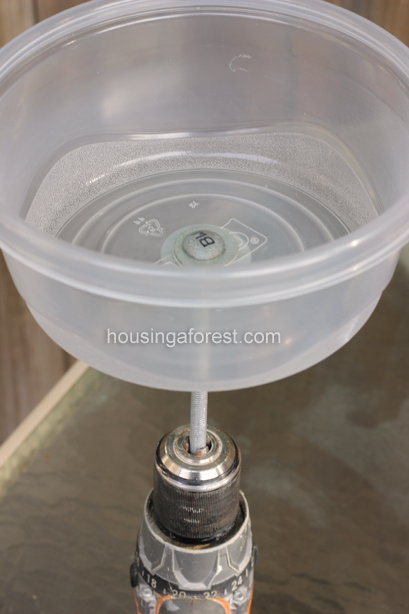
- Clear container with a lid
- Cardboard circle cut to fit the container ~ just to stabilize the paper
- Paper ~ cut to fit the container
- Masking Tape ~ to hold the paper to the cardboard when spinning
- Long threaded bolt, 2 washers and a nut
When my hubby and Kaleb came back from the garage, this is what they brought me. Amazing! Kaleb was so proud of his invention.
To set up your own Drill Spin Art Machine, simply drill a hole in the bottom of your container large enough to fit the bolt through. Slide one of the washers onto the bolt and then fit the bolt through the container so that the treated end comes out the bottom of the container. Add another washer and then tighten with a nut. Once you have all that together simply fit the end of the bolt into the drill and tighten like you would a regular drill bit.

I used our homemade spin art machine with a group of younger kids as well and it worked great. Just remember to remind them of the safety rules when working with tools.
Tips:
- Inside the container I used a piece of cardboard cut to the size of the paper just to stabilize the bottom. You probably can skip this step, it might just depend on the type of bolt that you use.
- Put on the lid after we added the paint. It tends to splatter a bit, but that is part of the fun.
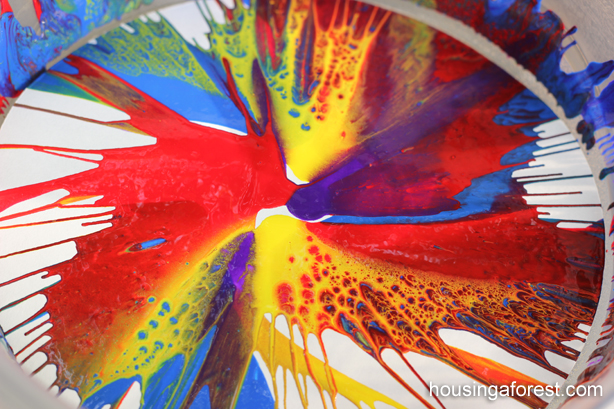
I love how pretty the colors look when they spin together. It looks just like the spin art that we have created with our store bought machine.
I love how the colors spill up the sides of the container. 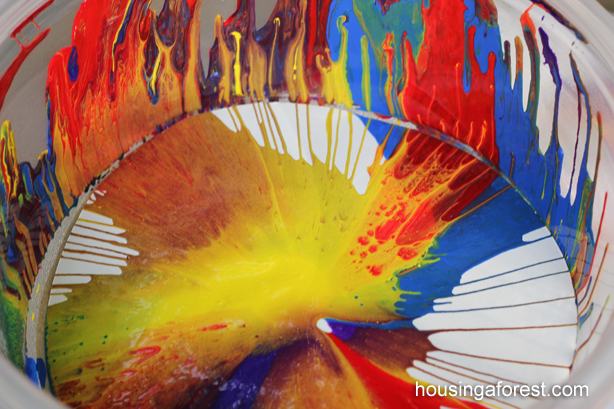 Each piece of art turns out different. This was a blast and something that we will be doing again soon!
……………………………………………………………
Welcome Back to Paint and Play! The Fun new series that I am doing with Crystal from Growing A Jeweled Rose. The focus for this series is all about the process, having fun and getting kids excited to create art! This week we challenged each other to put our own “spin” on creating Spin Art. Growing A Jeweled Rose got moving with her girls to make their art, and we headed to the tool shed to create a simple machine.
Make sure to stop by Growing A Jeweled Rose and check out all the amazing fun they had creating spin art through movement.

Don’t miss out on any of our Paint and Play series:
Super Creative Balloon Painting
……………………………………………………………
If you love process art like us, then check out my Painting Without Brushes Pinterest board. It is packed full of fun ideas. I would love to hear how you have used balloons to create or play with your kids.


Great Ideas. We use salad spinners to make spin art. We have tried two different ones from walmart The one that has a pull string works the best.
Thanks for the tip Tiffany! We have not tried using a salad spinner before.
LOVE THIS! Spin art is so fun on its own, and then the added dimension of figuring out how to make it happen is super cool!
My kids love tinkering and this was the perfect combination of art and tinkering:) My kids loved it!
What a great idea for those without a machine.
Do you clean the bowl out each time or just keep adding paper and leave the paint on the sides? What a fun idea!!
We just kept adding paper and then when we were finished creating for the the day, we washed everything out.
I remember that! Love the homemade version!
Thanks Angie! We had so much fun playing with our homemade version! I love how simple it was to create:)
Sooo cool. The power drill contraption is clever 🙂
Thanks Suja:) My boy is always up for a power tool challenge. I love what he came up with.
Pingback: Weekend Reads 6.1.13 | Not Just CuteNot Just Cute
This is just so incredibly genius! I remember making spin art t-shirts when I was younger. Loved those shirts. The electric drill part is brilliant!
I love the idea of making T-shirts! I may have to try that with my kids. They would love it!
I LOVE these creative ideas for a spin art machine. We got a cheap salad spinner from Ikea and are going to use it for the same thing. But these are SO SMART!
Love it Leah! We have not tried the salad spinner version yet. We may need to take a trip to IKEA.
Your spin art came out just beautifully! What a fun idea!
Spin art is my kids favorite, however adding poser tools totally took it to the next level:)
Pingback: Friday Faves June 7, 2013
Pingback: Watercolor Spin Art - Buggy and Buddy
Pingback: Painting with Candy | Housing a ForestHousing a Forest
Hi there, just became alert to your blog through Google, and found that it’s truly informative. I am gonna watch out for brussels. I’ll appreciate if you continue
this in future. Many people will be benefited from your writing.
Cheers!
I’m wondering if you could contain those splatters up the side of the container by using a coffee filter as your paper, that that none of the art is wasted in the container. It might be too flimsy, but maybe using several layers would work.
I am soon going to enjoy hearing everyones great trials and errors….half the fun
I Have been using salad spinners for a few years now. I have a string type but it had a raised center so I used some modeling clay around the mound and made a flatter surface and stuck cardboard on top them our spinner paper. I got this one at a yard sale for $ 2.00.
The other is newer and a pump action which the kids love too, the base in this one is flat. I use watered down acrylic paint and wash it out when we are all done.
We use the spin art for cute note cards.
We use a salad spinner. ( just need to tape paper down so it doesn’t curl as it spins)
You won’t have to cut paper circles if you use dessert-sized paper plates. Since they’re stiffer than paper, the goopy paint can dry without warping the plate.
We tried spin art with several kitchen appliances. We have lots of artistic success with the food processor but the technical obstacles were substantial.
In my search for alternate ideas I came across a DIY for modifying an old box fan that looked very intriguing. If only I had an extra fan!
Love love love the drill idea!