Christmas Gingerbread Party
My sweet girl Breanna loves parties as much as I do. She started thinking of her birthday party months ago. After much deliberation on what type of party to have, she finally settled on a gingerbread theme. I love Christmas, and could not wait to begin planning and decorating. Bree’s party was the first part of November, so that means my house has been all decked out for Christmas since the day after Halloween. I know, it seems a bit early to be decorating for Christmas but really whats a few weeks right?

These were the birthday invitations we sent out, all the party information is other side. I used foam tape on the gingerbread man to create depth. Bree loved how they turned out.

Bree wanted her birthday cake to look like a gingerbread house. Seemed simple, but I probably should have used supports. The cake slowly started tilting. Whoops. No mishaps, just a slow leaning gingerbread cake. I made 2 9×13 cakes to create this house. The kids always request chocolate cake for their birthday. My Grandmother’s chocolate cake recipe is amazing! I love that it always seems to turn out perfectly and it is so moist and yummy. Thanks Grandma!

The Christmas trees were all covered in little paper gingerbread men and white snowflakes. Since I love using what I have on hand, when I found a large roll of brown craft paper in our basement I was super excited. I was the perfect color for gingerbread men and a bit heavier than regular paper. My sister-in-law is wonderful and spent the evening cutting out all the cute little gingerbread men on her Cricut! Thanks Laurie! I outlined them with white paint. I love how they turned out, plus as a bonus they will be the gift tags on all our Christmas presents this year!
I also used cookie cutters as ornaments. They looked cute and perfect for a gingerbread party.

This is our ever changing wall. It was a beautiful mural painted by Annika’s friends at her Art party and then used a projection wall for Kaleb’s Wii party. For Bree’s party I strung Christmas ornaments on fishing line and used thumbtacks to hang them. The Christmas ornaments look beautiful at night when the tree is on. So simple, yet they have a big impact.

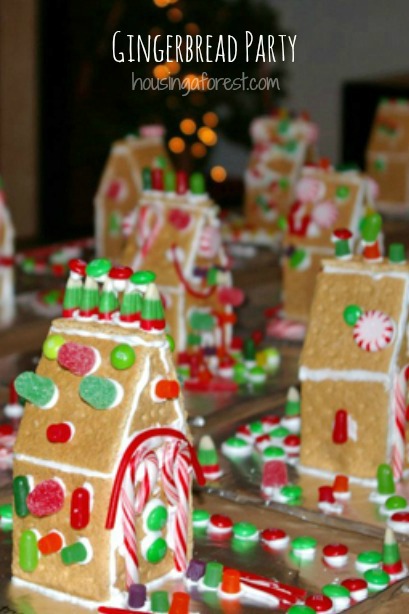
I made 25 little Gingerbread graham cracker houses ahead of time so all the kids had to do was decorate them. They are so simple to make, but take a bit of time to put them together. I used a square of cardboard wrapped in tinfoil as the base. The table and buffets were also wrapped in brown craft paper with a painted edge.


The kids loved decorating their houses. Each of the kids were given a Ziploc baggie filled with icing. I snipped a small corner of the baggie so that it worked as a piping bag. The baggies were easy for little hands to use and mess free. A definite bonus when working with that many kiddos! Each of the kids were given a cup cake liner that they brought to the candy counter. Having all the candy in one area eliminated sticky little fingers reaching across gingerbread houses for more candy and accidentally tipping one over. The kids were welcome to fill their container as many times as they wanted.

Bree wanted to play pin the button on the gingerbread man. More craft paper and white paint and voila a cute gingerbread man. We also played a game of hide the gingerbread man. Bree decorated 3 small gingerbread men with glitter glue. The game was super simple. 3 kids each hid a gingerbread man in the house, once the gingerbread men were hidden the rest of the kids tried finding the gingerbread men. So simple and easy, but the kids LOVED it. I also told the kids that gingerbread men were frightened of loud noises and if the kids wanted to find the sneaky gingerbread men they needed to tiptoe and talk in quiet whispers. So funny to watch a house full of first grades sneak around looking for the gingerbread men.

The houses turned out so cute! I love all the effort the kiddos put into each one. Bree thought it would be cute to only use Christmas colored candies (dots were her one exception). I love how they turned out!


Along with the cute gingerbread houses the kiddos made, we sent each of the kiddos home with homework. At the party while we were waiting for all the guests to arrive the kids made pipe cleaner snowflakes and gingerbread men. They turned out really cute. As part of their take home bag, I made little packets with clear instructions on how to create borax crystals along with a container of borax. Our kiddos love to create these amazing crystals. Here are some examples of borax crystals that we created for St. Patrick’s Day and Easter. I love how the gingerbread men and the snowflakes look sparkling on the tree.
This was a great party and the perfect way to kick off the holiday season. Happy 7th birthday Breanna.


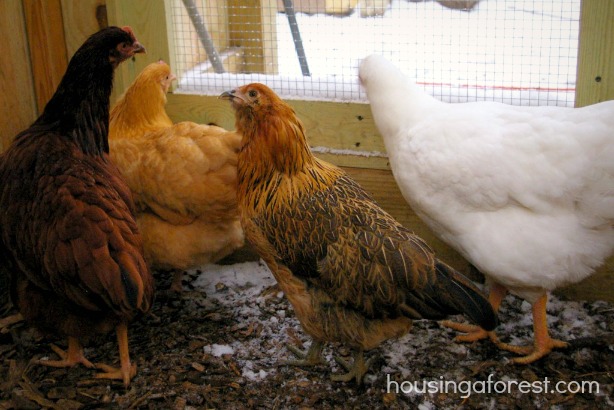

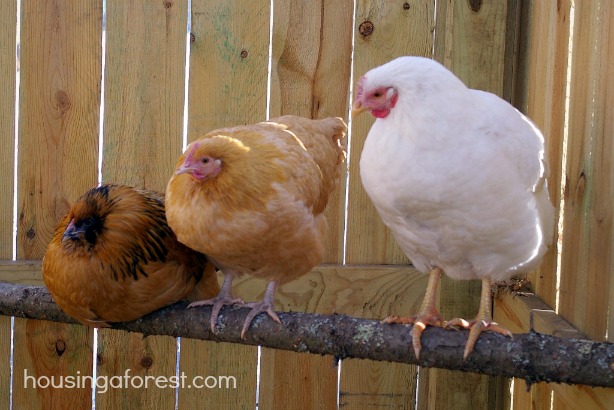
 Chippy is part of our home. Yes that is her in front of a Christmas tree in our living room. Kaleb did not want her to miss out on the gingerbread decorating party. Ha! I guess if your dog or cat can join in on family fun, why not the kids chickens right?


